Tuesday, November 30, 2010

REVIT Wall with Reveal to Create a Planter

I had this question come up today and thought it would make a great tutorial.
Below is a 3 part CADclip series on how to use a wall and a built in reveal to create a Planter.

Friday, November 19, 2010

Wednesday, October 06, 2010

REVIT Server

Wow, I just like the sound of those words . . . . REVIT SERVER . . . . . yes in deed.
Just seems to naturally roll off the tongue.
This is going to 'open a few doors' . . . pun intended . . .
Autodesk has a new product coming out named 'REVIT Server' that uses a WAN and a web based administrative tool to access the 'central file' on the 'central server'. Then the central server manages and syncronizes the data to the local servers which deal with the local PCs.
After all, as everyone gets BIM'd up the next natural step is to be able to connect the models across a WAN for a geographically challanged, collaborative REVIT project.
Read more here.

Thursday, August 05, 2010

REVIT Flared Bottom Tread

Above your see the 3D and sketched plan view of how to make a flared the base tread of a tread in REVIT.

Saturday, July 31, 2010

REVIT Deleting Constraining Dimensions


We have all seen the dialog box above when we 'delete' a dimension that is 'constraining' geometry but do we pay attention to the difference between options 2 & 3 even though it is explained in the warning dialog box?

Option 1 To click 'cancel' simply cancels the delete and you are back to where you started from.

Option 2 To click 'Unconstrain' deletes the dimension and also unconstrains the geometry.

Option 3 To click 'Ok' is the odd man out. This option deletes the dimension but actually leaves the geometry constrained just like the dimension was actually still there (but it's not).

If you don't understand this, going with option 3 can cause great confusion down stream. You think . . . . I deleted that constraining dimension so how can it still be constrained??

So then if you select one of the elements that is still being constrained after the constraining dimension has been deleted you will see the constrains show up in blue temporary style.

See images below.

Typical 'Equal' constraining dimension before deleting it.

Same as above after deleting the dimension and going with Option 3. The dimension gone but still constrained ! Select one of the elements to see the constraints that still exist. Clear the selection and the constraints disappear. If you do in fact want to clear this 'EQ' constrain click the blue EQ symbol.
This concept also applies to 'Locked' constraining dimensions. Typical locked geometry.
Geometry after the locked dimension has been deleted but going with Option 3. Select an element and the constrains show up. Clear the selection and the display of the constraints disappear. If you do in fact want to clear this constrain clcik the blue lock symbol.

CADclips REVIT Videos Here

Monday, July 26, 2010

REVIT Basic Arched Opening

Revit comes with a Basic Arched Opening that can be either Elliptical or Round.
Note that the Elliptical Arched Opening family that comes with REVIT is located in the 'Door' folder even though it is categorized as a 'Generic Model' and not a Door. Therefore it is technically a 'Component' and not a door.
The CADclip below shows you how to load it and how to change it from elliptical to round using the 'Spring Offset' type parameter.

Wednesday, June 30, 2010

REVIT - All in a Days work

I was given a set of architectural constraints and asked to 'design a cottage'.
Although I am fairly certain I will not win any design awards, above illustrates what can be created from scratch, delivered to the customer (across the country) and posted to your blog in only a few hours.
We've come a long way baby !
The Design Constraints included:
Building Height (measure from underside of main floor joist).
Floor to floor height
Square footage limits for main and loft
Front Facade
Roof Pitch
Deck sizes

Tuesday, June 15, 2010

REVIT - Create Similar Tool

The Create Similar tool has become my new favorite Button. I use it about . . . . . a 1000 times a day.
I call it the 'Gimmy One of These" button.
This button shows up on the ribbon after you select an item. The bonus is it also adapts to the properties of the item selected.
For example if you select a wall it will adapt the properties of the new wall to be created to include wall type, base and top constraints as well as offsets.
This also works with Structural objects and MEP objects.
Very nice in deed !

Thursday, June 10, 2010

CADclip - Relocate In Place Family

Another CADclip on relocating an inplace family to a different surface or shall I say 'Host'.

Thursday, June 03, 2010

CADclips announces $29 for Full Download Access

Your eyes are not playing tricks on you.
Starting June 8, 2010
CADclips is offering a Full REVIT Video Download Access for only $ 29.
Now ANYONE who wants to, can learn REVIT !

On your mark
Get set
GO !
This promotion has been adjusted to $89 as of July 14, 2010.

Wednesday, June 02, 2010

REVIT Basic Window Family Tutorial

Now offers Full REVIT Video Downloads for only $89


In the 10 minute CADclip below I show you. step by step. how to create a
Basic Fixed Picture Window Family.

Nothing complicated but the essentials of how to make a Window Family.
If you enjoy this you may want to invest a mere $29 at CADclips for 1000+ more videos !


Monday, May 31, 2010

30 Hours of Free AutoCAD Video Training

Now offers Full REVIT Video Downloads for only $89

Click the image above for 207 (30+ hours) of free AutoCAD Video Training. On the left hand margin scroll down and click the AutoCAD 2008 - Complete Series.
That's it.
207 videos for over 30 hours of in-depth AutoCAD training.
Lab exercises included.

REVIT Leader with No Text

Now Offers 1 Year of Full REVIT Video Tutorial Downloads for only $99
Ok, this one is for the migrating AutoCAD people.
Even though AutoCAD has had the 'Multi-Leader' for ever' most AutoCAD users still place the text and leader lines seperately in the DWG.
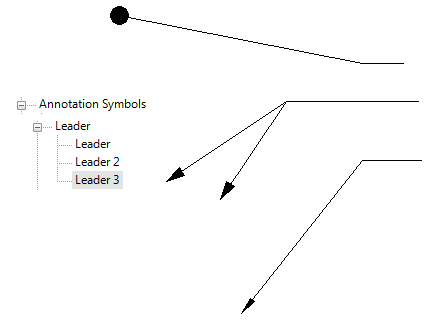
In REVIT I do not believe there is an 'out of the box' way to just place a leader line with no text.
The answer is to create a new 'Generic Annotation' family (wblock) of 'nothing'. That's right an annotaion family of NOTHING.
Then save and load this (blank) family into your project.
Then within the project right click the family in the (PB) > 'Type Properpties...' and assign a 'Leader Arrowhead' style.
Now drag the new leader family into the editing window.
Now (in 2011), on the options bar, when you place the family you will get a choice of how many leader lines you want.
After the fact you can select the family on screen and then Add or Remove leaders to the instance.
You can also edit the 'type properties' (right click in the PB) and 'Duplicate' the family and make variations of that same family but with different arrow head styles.
I just got a comment from someone on the Student Autodesk Facebook site that said this works great for 'slope arrows' in REVIT and I tend to agree.
Here's the CADclip.

Friday, May 28, 2010

REVIT Structure 2011 Temporary Dimensions

Now Offers 1 Year of Full REVIT Video Tutorial Downloads for only $199


REVIT Structure (and Arch. , MEP) have a couple welcomed new features in the area of 'Temporary Dimensions'.
1. You can now adjust the size of the text of a temporary dimension (without tweeking the revit.ini file) and specify whether the background is transparent or opaque. Much better !
2. (this is a big one) REVIT now remembers if you relocate the witness line of a temporary dimension. Even if you save the project and open it later. HUGE YEAH !!
Below is the CADclip

Thursday, May 27, 2010

Learn Revit 2011 with CADclip Video Tutorials

Now offers Full REVIT Video Downloads for only $89


The CADclip below shows you a little bit about the latest (and greatest) REVIT Architecture 2011 Tutorial Training Series available at CADclips.

CADclips are available to Individuals or can be delivered Enterprise Wide.


Wednesday, May 26, 2010

REVIT 3D Section Views

Now offers Full REVIT Video Downloads for only $89

I like to take advantage of ALL of REVITs wonderful benifits . . . . . and here's another.
Watch the CADclip below to see how you can instantly turn a regular section view into a 3d
sectional view.
OH . . . . . did I mention that this also works for plan views as well. By default the 'section box' gets turned on but the visibility has been turned off so you will have to use the 'light bulb' tool to access the section box.
Great for the MEP people with Plenum Spaces.

Tuesday, May 25, 2010

REVIT Reset Level to 3D Extents

Now offers Full REVIT Video Downloads for only $89

Have you ever been frustrated trying to 'Reset to 3D Extents' for a Level !
I know I have.
Here's the tip:
You cannot 'Reset to 3D Extents' for a level 'while the view is being cropped'.
That's it.
Just (temporarily) 'turn off' the 'cropping' of the view you THEN you can freely 'Reset to 3D Extents' for a Level with a 'right click' or by dragging the level's 2D or 3D grips.
This had frustrated me to no end in the past.
Below is a fresh CADclip demonstrating this concept.
UPDATE:
I have since been informed that if all 3D extents of a level line lie 'within' the crop region then you CAN in fact use the 'Reset to 3D extents' tool. When you think you know everything . . . . be afraid : )

Saturday, May 22, 2010

REVIT has Totally Changed my Deliverable

Now offers Full REVIT Video Downloads for only $89

I need new sun glasses because the BIM shining through is making me quint.
I am just tickled to provide drawings like above to my customers. A 3D view that takes about 4.8 minutes to generate and is worth it's weight in plutonium, on the job site. This is just a plain jane residential foundation. Think about what could be done in a much more complex model. I chose to isolate the concrete but you could isolate what ever you wanted for the needs of that BIM aspect.
Spot Elevations are a structural modeler's 'Fairy God Mother'. Sprinkle a little BIM dust on the model and all the spot elevations update instantly. It's easy to do. 1. Duplicate the {3D} view (or create a new camera view etc) 2. Isolate only the objects you want with the temporary hide / isolate tool. 3. Go back and forth with the light bulb tool until the view shows what you want then Apply to the view.
! DANGER: This next step requires the use of Sunglasses 4. Slap in some 'Spot Elevations'.
. . . . NOW, CAN YOU FEEL THE HEAT RISING?

Friday, May 14, 2010

REVIT MEP 2011 Review

Here is a link to a REVIT MEP 2011 review posted at REED Construction Data.
REVIT MEP 2011 Review
Looks like RMEP has made some significant improvements and is moving in the right direction according to Mark Mergenschroer.
Key features mentioned in the review are:
Fixture Management
Customizing Electrical Panel Schedules and using Panel Schedule Templates
Assign spares and spaces
Rebalance Loads
Move Circuits Easily
Lock the Circuits
The ability to place the Panels on Sheets for Consistency and Size
Demand Factors Monitoring and ‘Total Demand Load’
Functionality to Coordinate Realistic Conduit and Cable Trays
Flat Oval Ducts
Reconcile Hosting Under the Collaborate Tools
Selecting all Instances Visible in the View or in the Project
Worksets in General
Place Valves and/or Fittings in a Section or Elevation View
Tag on Placement
Properties Palette
Speed of Software and Model Management has Improved

Thursday, May 13, 2010

CADclip - Waffled or Coffered Ceiling Tutorial

Now offers Full REVIT Video Downloads for only $89

In the 5 minute CADclip below I demonstrate how to create a Waffled or Coffered Ceiling using a REVIT In-Place Void family.
I keep it pretty basic but you could use multiple void / solid geometry to achieve a more creative result.

REVIT 2011 Interface - Can we stop now ?

Some days while I am working or teaching on the big screen I just stare at the REVIT 2011 ribbon and go blank trying to find something like . . . . . . . . 'Object Styles'. It is especially frustrating when the button I am looking for has now been moved to it's very own 1 square inch peice of realestate on the ribbon. I know, I know, I can use the keyboard shortcuts but after all I make my living teaching others how to use the software. If the Autodesk programmers redesign the @&# interface one more time I am going to hitch up my dog sled, portage my way to the main land, across New Brunswick, down through Maine to Boston and then stand outside the building and yell profanities. Or maybe I'm just getting old.

Tuesday, May 11, 2010

REVIT Jogged Section Lines

Now offers Full REVIT Video Downloads for only $89

This is nothing new but I'm surprised at how many people are not aware of this feature. Select a section line and then use the Split Segment tool to create jogs in the section line and subsequent view.

Monday, May 10, 2010

Free Ball Cap With All CADclip USB Sales

CADclips is currently having a 33% off sale with a Free Ball Cap or Coffee Mug to all USB sales.
Get them while they are hot !

Sunday, May 09, 2010

REVIT 2011 Roof Basic Videos


Below are 10 great CADclips on REVIT Roof basics as illustrated in the image above. The CADclips cover the basics for Gable, Hip, Intersecting, Gambrel, Mansard, Butterfly and Shed roofs. Alhough I am using REVIT Architecture 2011 in these CADclips these lessons apply to RAC and RST back several versions.