 3D View of Railing
 Ballaster Panel Family Template
 Ballaster Configuration Dialog Box
 Railing Configuration Dialog Box
Above are 4 images.
The top image is of the completed railings with one railing type for flat railings and one railing type for sloped railings.
Each railing type (flat and sloped) contains two railings, two end posts, 1" ballasters and 2'-0" wide glass panel 'ballasters'. Yes the glass panel is a ballaster !!
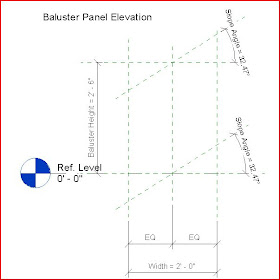
The second image is inside the new ballaster family template (Ballaster-Panel.rft).
Here we create and load two new ballaster panel families. Each ballaster panel family is made up of an extrusion 1/4" thick with 4 sides aligned and locked to the reference planes.
For the flat railing type, use the vertical and horizontal ref. planes.
For the sloped railing type, use the vertical and sloped ref. planes.
Make the extrusion material 'glass'.
After you load the two ballaster panel families into the project you can assign them to the new railing family.
Next we need to duplicate the 'Railing- Handrail -Pipe' family twice and rename them 'Glass Panel Rail Flat' and Glass Panel Rail Slope'.
The two new railing types will be identical other then specifying the sloped or flat ballaster panel.
The third image is of the Ballaster Placement dialog box found in the type properties of the railing.
Note the families and the numbers.
The forth image is of the Railing Structure dialog box found in the type properties of the railing.
Note the families and the numbers.
* From what I can tell, when working in the ballaster placement dialog box the 'distance from previous' is measured from the ballaster center lines.
*Also don't forget to set the ballaster 'Justify' to 'Spread Pattern to Fit'.
* You can set the panel width (2'-0" by default) in the type properties of the panel family listed in the project browser (double click).
The panel height is controlled by the ballaster placement dialog box. (top and base offset)

This is one of the best posts that I’ve ever seen; you may include some more ideas in the same theme about Flat Top Railings. I’m still waiting for some interesting thoughts from your side in your next post. tyme
ReplyDelete