
Don't look now but CADclips.com is hosting the first ever
completely Online and Interactive CADclips University (CU).
This November 20, 21, 22, 23.
Click the logo above for more information.

This blog is provided for All Things REVIT.
This November 20, 21, 22, 23.
Click the logo above for more information.

 for posting this CADclip on their site.
 'Areas' are automatically calculated as you would expect and readily available. You can also use 'room seperators' where walls are not present but rooms change information.

 for posting this CADclip on their site.
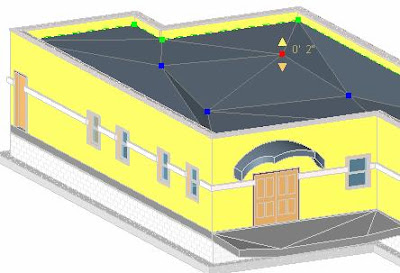
You must start with a flat roof, floor or slab and if it's a roof it cannot be attached to another roof but I'm here to tell you "it really works wonders on modeling flat sloped roofs".
You can however 'attach' walls to the top / underside of these warped roofs and floors. You can pick 'beam supports' as shape criteria and the floor, roof, slab will form a split line over the beam and create the slopes. The beam supports themselves can be sloped!


 for posting this CADclip on their site.
You start by filling in the 'cost' parameter (field) for the family. Then you create a schedule, select the catagory (furniture in this case) and add the fields you want to quantify such as cost, family type and floor level of the furniture item.
Then we use the Grand Total and Total Costs schedule properties to list the information.
Below is a link to a great CADclip explaining how to create a Furniture Schedule and Total up the costs.
for posting this CADclip on their site.  Autodesk has provided us with the REVIT Building Maker tools to convert Mass Object faces to Walls, Roofs, Curtain Systems and Floors.........and maintain associativity.
The key is we have to make sure the Mass Object Family is of the Family Category > 'Mass'.
You can maintain two seperate 3D views to manage the Mass object and the new Building Components simultaneously. You can change or alter the Mass object and 'Remake' the building components and watch the model update instantly. It's like magic.
Below is a link to a great CADclip explaining how to use the 'Building Maker' tools.
 Check out the REVIT Factory web site ! for posting this CADclip on their site.
  Esentially, you can cut up a primary view into other smaller views while still keeping the connectivity. The smaller, dependant views are organized below the primary view n the Project Browser for convenient access.
 More info here > for Dependent Views and hiding objects
for posting this CADclip on their site.  Esentially, you can cut up a primary view into other smaller views while still keeping the connectivity. The smaller, dependant views are organized below the primary view n the Project Browser for convenient access.
More info here > for Dependent Views and hiding objects
for posting this CADclip on their site.  If you turn on the 'Annotation Crop' region you will see a new 'Green' crop region that will solve the problem.
By default the primary views in revit do not have the 'annotation crop' region turned on but it is completely available.
Below is a great CADclip link explaining how to use the new 'annotation crop' region.
for posting this CADclip on their site. 
* Click HERE to read about 100's of REVIT jobs *
for posting this CADclip on their site. 
* Click HERE to read about 100's of REVIT jobs *
for posting this CADclip on their site.. 
* Click HERE to read about 100's of REVIT jobs *
for posting this CADclip on their site. Can you see the difference ? for posting this CADclip on their site.

 1. We start with a basic Structure of Columns and beams.
* Click HERE to read about 100's of REVIT jobs *
for posting this tutorial on their site. I know most of you already had this figured out but not being a structural 'designer' I was a little confused about the 'Structural Usage' property of the term 'Beam'.
.
for posting this CADclips on their site.


* Click HERE to read about 100's of REVIT jobs *
* Click HERE to read about 100's of REVIT jobs *
 for posting this CADclip on their site.
 With Keynotes you can link all materials and elements to an external 'keynotes' file and then tag the objects or materials with great ease.
* Click HERE to read about 100's of REVIT jobs *
for posting this CADclip on their site.


