Wednesday, September 19, 2007

REVIT Architecture 2008 Curtain Systems Video


Watch the video above and learn how to draw this Solarium in about 8 minutes.

REVIT Curtain Systems and Curtain Walls are really easy to model.

You can draw Curtain Walls just like any other wall and you can model Curtain Systems by using existing model edges, faces or linework.

In the video demonstration above I use a few model lines placed at two different levels to quickly construct the solarium you see above.

Tuesday, September 18, 2007

RST 2008 Coping Steel Intersections

Thanks to for posting this tutorial on their site.

REVIT Structure 2008 'Coping' Video Tutorial.


(in the video above I say REVIT 'Architecture' which is incorrect. It is 'Structure'.)
There are a couple new buttons that showed up in REVIT Structure 2008 for 'Coping'.

That is 'coping' not 'copying'........right.

Coping is fun. Coping is easy. Coping simply rocks!

View the video above to see how the REVIT developers have made another cool 3D modeling feature one step easier to use.

Sunday, September 09, 2007

REVIT MEP 2008 - Lets get it on !

Thanks to for posting this REVIT MEP 2008 Overview on their site.


REVIT MEP 2008 in action
Well I am starting to ease my way into REVIT MEP. Yeah !

What's not to like about a full 3d solution for Architecture, Structural, Mechanical, Electrical and Plumbing. All with discipline specific models talking to each other, sharing data and interfacing in the same way. Yes, yes, I think I like this BIM approach.

I have to say, it's a different point of view from the MEP side of the 'monitor' (no pun intended).

There's a little more regard for the files you are receiving and the format in which they arrive on your door step. Hopefully you can get a REVIT Architecture model with all the walls and 'Rooms' positioned accordingly.
REVIT 'rooms' are initially created by the architect and then utilized by the MEP people. Then the MEP people start their own new project file and link in the architectural model. Using the Copy / Monitor tools the MEP people can create a local copy of the 'rooms' and design away in full 3D , all while monitoring the changes from the original architectural model.


You choose to view the architectural model as you please and where you please. You can even host local MEP components (fixtures) on linked model objects such as walls, ceilings and floors. But there is an issue that autodesk has to address......read on....

One current issue with REVIT MEP seems to be with regards to 'surface hosted' vs 'object hosted' families. REVIT MEP components such as electrical and lighting fixtures are created (out of the box) as 'wall hosted','ceiling hosted', 'floor hosted' etc.
This works great until the linked architectural wall, ceiling or floor goes missing or is non orthagonally altered. Then all your fixtures go missing as well.
If / when the MEP components or fixtures are 'surface hosted' they do not dissappear when the linked wall or room goes missing.
The problem is most REVIT MEP components 'out of the box' are NOT surface hosted families they are object hosted.

Do you want all your fixtures to dissappear if the architects wall or ceiling dissappears? Maybe or maybe not. I'd say leave it up to me as to what I want to do with orphaned fixtures.

Now, do we start to convert all the 'object hosted' components to 'surface hosted' components or do we wait for autodesk to solve this fundamental problem? I would say just convert the components we use the most and wait to see.

Below are some Autodesk produced videos giving an overview of a few REVIT MEP topics.

(My apologies for the dead autodesk links below. I will get them resolved)

Electrical Overview Videos

Electrical Lighting and Power Circuitry

Electrical Lighting Calculations

Electrical Power Load Balancing, Wire Sizing and Panel Schedules

Electrical Wire Tags and Lighting Switch Topology

Fire Protection Overview Videos

Fire Protection Sprinkler Placement

Heating and Cooling Overview Videos

Heating and Cooling Load Analysis

Mechanical Overview Videos

Mechanical Design Criteria

Mechanical Duct Sizing and Inspection

Mechanical System and Duct Layout

Plumbing Overview Video

Plumbing System Layout


REVIT Structure 2008 Videos by Autodesk

Below are some general tutorial videos for REVIT Structure 2008
provided by Autodesk.
(sorry the videos below are temporarily out of order, please chech back later)

Thursday, September 06, 2007

REVIT Keyboard Shortcut Commands

Thanks to for posting this CADclip on their site.


Above is a great silent video explaining how to create keyboard shortcut commands in all REVIT based products.

Because REVIT does not have a 'command line' or at least one that we can see, Keyboard Shortcuts are a quick way to access the existing Pull Down menu commands.


Have you ever noticed that to the right of some pull down menu commands are two (shortcut) keys that you can type instead of going through the pull down menus.

You do not have to hit enter with REVIT just the 2 characters.

It is user customizable by editing
the KeyboardShortcuts . txt file.

Friday, August 24, 2007

REVIT Structure 2008 Rebar Area Reinforcing

Thanks to for posting this CADclip on their site.

Rebar Rocks !

The new Area Reinforcing system family makes laying out nominal steel a sinch.

Because REVIT tools all work the same it really takes no practice at all.

Select the slab or wall, click the area reinforcing tool and sketch the area outline including openings.

Perhaps use the pick tool and perhaps lock the sketch lines to the slab edges. We've done this before with floors and roofs.

Then simply use the properties to specify the top and bottom rebar size, spacing, bla bla bla and you're done.
This rebar does not show up in 3D but it does show up in all sections.

In true REVIT fashion it parametrically updates everywhere as you make changes in any view.


Below is a link to a great video CADclip showing how Area Reinforcing works.

(click the link above to play the CADclip or right click and "save target as..." to download)

Tuesday, August 21, 2007

First Annual CADclips University

Don't look now but CADclips.com is hosting the first ever


completely Online and Interactive CADclips University (CU).

This November 20, 21, 22, 23.

Click the logo above for more information.


Saturday, August 18, 2007

RAC 2008 Color Schemes Demo


Thanks to for posting this CADclip on their site.

I have to say, I never quite got on the band wagon for the 'Color Fill Schemes' features of REVIT......until now that is.

This is clearly a 'value add' service I now provide. It's so easy it will make your head spin.

It's 'all about' the 'Room' objects. Data in = Data out.

Listen closely now.....you can assign a Color Scheme as a property to the view. SO...Duplicate a view......assign a Color Scheme...bla...bla...bla.

Once you place the room objects (which get created in a single click) you can provide the room information. ie: Room Name, Number, Floor Finish, Base Finish, Ceiling finish, Wall Finish, Department, Occupant. Then that's it......the work is all done.

'Areas' are automatically calculated as you would expect and readily available. You can also use 'room seperators' where walls are not present but rooms change information.

The Color Schemes take over from there and they automatically assign the colors. Then you can re-assign any color you choose.

How would you like it colored up?
By department? By room name? By a set of user created area ranges? It's all up to you.

You can even add new system parameters to rooms through 'project parameters' to add in a field that does not come with the out of the box 'room' object.

Perhaps you want to sort / color a plan by 'lighting type' or 'heating source' or 'type of carpet' 'type of tile' anything you want.

Below is a link to a great video CADclip demonstrating these great Color Fill Schemes features.
(click the link above to play the CADclip or right click and "save target as..." to download)

Thursday, August 16, 2007

REVIT 2008 Shape Editing Roof Tools


Thanks to for posting this CADclip on their site.

REVIT 2008 Architecure and Structure have made leaps of progress in the way of Roof, Floor and Slab tools.
"It's Warped" .....pun intended.
With these new 'Shape Editing' tools (shown below), the sky is the limit. As indicated they work with Roofs, Floors and Slabs.


With the Draw Points, Modify Sub Element, Draw Split Line and Pick Supports tools you can specify the relative elevation of points or edges on a roof, floor or slab.
It works just like the existing toposurface 'points' tool but for floors and roofs.....I think these REVIT people are really listening to us?!
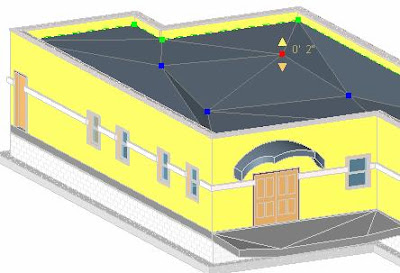


The green nodes are the roof perimeter points, the blue nodes are user created and the red ones are active.
You can even use the good old ctrl+click to select more than one point or edge at a time.
The perimeter roof edges are green dashed lines and not really obvious in the image above.....but trust me, they are there and they are fabulious.
The REVIT Developers R O C K !

You must start with a flat roof, floor or slab and if it's a roof it cannot be attached to another roof but I'm here to tell you "it really works wonders on modeling flat sloped roofs".

You can however 'attach' walls to the top / underside of these warped roofs and floors. You can pick 'beam supports' as shape criteria and the floor, roof, slab will form a split line over the beam and create the slopes. The beam supports themselves can be sloped!


The image below says it all. 4 corners at 4 different elevations.

Outside these great new shape editing tools I really like the ability to provide a 'variable' thickness to perhaps...........a rigid insulation layer of a roof structure!

The image below shows the new Variable thickness option for a roof component layer. Only one layer can be variable as you would expect.


Then you can create a roof (or floor) that slopes on the top but is horizonal on the bottom even if there is only one component.

Below is a section of the result. YEAH !


Perhaps even take it a step further and use the new 'spot elevation' dimension to indicate the surface elevations anywhere you please. YES YES YES !

Below is a link to a great video CADclip explaining how to a model a sloping flat roof with a variable rigid insulation layer.


REVIT - Flat Roof with Tapered Insulation Layer
(click the link above to play the CADclip or right click and "save target as..." to download)

Wednesday, August 08, 2007

REVIT Furniture Cost Schedule Tutorial

Thanks to for posting this CADclip on their site.

I have had a few inquiries about getting 'costs' and 'total costs' quantified in a schedule. It's a little tricky so I thought I would create a video tutorial.

You start by filling in the 'cost' parameter (field) for the family. Then you create a schedule, select the catagory (furniture in this case) and add the fields you want to quantify such as cost, family type and floor level of the furniture item.

Then we use the Grand Total and Total Costs schedule properties to list the information.

Below is a link to a great CADclip explaining how to create a Furniture Schedule and Total up the costs.

(click the link above to play the CADclip or right click and "save target as..." to download)

Thursday, August 02, 2007

REVIT Mass Building Maker Tutorial

Thanks to for posting this CADclip on their site.

Autodesk has provided us with the REVIT Building Maker tools to convert Mass Object faces to Walls, Roofs, Curtain Systems and Floors.........and maintain associativity.

The key is we have to make sure the Mass Object Family is of the Family Category > 'Mass'.

You can maintain two seperate 3D views to manage the Mass object and the new Building Components simultaneously. You can change or alter the Mass object and 'Remake' the building components and watch the model update instantly. It's like magic.

Below is a link to a great CADclip explaining how to use the 'Building Maker' tools.

(click the link above to play the CADclip or right click and "save target as..." to download)

Friday, May 18, 2007

The REVIT Factory

Check out the REVIT Factory web site !

You can buy and / or sell revit family content and tutorials.

Products, Forums, Competitions, Resources, Support .......

REVIT Dependent Views - Plan Application

Thanks to for posting this CADclip on their site.

All the REVIT 2008 products can take advantage of the new 'dependent view' tools.

Esentially, you can cut up a primary view into other smaller views while still keeping the connectivity. The smaller, dependant views are organized below the primary view n the Project Browser for convenient access.

The image above say's it all !

Below is a great CADclip link explaining how to use the new 'dependent view' in an elevational aspect.


(click the link above to play the CADclip or right click and "save target as..." to download)

REVIT Dependent Views - Elevation Application

Thanks to for posting this CADclip on their site.

All the REVIT 2008 products can take advantage of the new 'dependent view' tools.

Esentially, you can cut up a primary view into other smaller views while still keeping the connectivity. The smaller, dependant views are organized below the primary view n the Project Browser for convenient access.

The image above say's it all !

Below is a great CADclip link explaining how to use the new 'dependent view' in an elevational aspect.


(click the link above to play the CADclip or right click and "save target as..." to download)

More info here > for Dependent Views and hiding objects

Annotation Crop Region

Thanks to for posting this CADclip on their site.

Have you ever tried to crop a view and the dimensions (or some of them) don't get cropped ?

Well REVIT introduced the 'Annotation Crop' region to solve this problem. The reason is: The objects that the dimensions or annotations are related to are still within the 'model crop' region even though the actual dimensions are not.

If you turn on the 'Annotation Crop' region you will see a new 'Green' crop region that will solve the problem.

By default the primary views in revit do not have the 'annotation crop' region turned on but it is completely available.

Below is a great CADclip link explaining how to use the new 'annotation crop' region.


(click the link above to play the CADclip or right click and "save target as..." to download)

Thursday, April 26, 2007

Over 300 REVIT Jobs posted here

It's starting to look like a good REVIT user has got wings ! ....what I mean by that is if you get yourself trained up on REVIT, learn how to manage worksets, learn to be able to make families and perhaps start to get a handle on the BIM aspect you can pick your job and location around the world. With the introduction of REVIT Structure and MEP to compliment the Architecture it's starting to gain some serious steam. And if my better judgement is correct I would say...a shortage of experienced users is in the making. Steve Stafford has created another great blog specifically for posting REVIT jobs and as you will see from the links below, the world is the limit. There is really nothing like having the skill set that allows you to travel the world. It's a great feeling ! For those of you who haven't jumped on the REVIT wave. . . . . . what on earth are you waiting for !! Here are some REVIT job sites you should bookmark. Steve Stafford's Blog http://www.revitjobs.blogspot.com/ REVIT City job postimngs http://www.revitcity.com/jobs.php/ 264 REVIT jobs posted here and more added every single day ! http://autocad.jobs.monster.com/jobsearch.asp?q=revit&re=0&sort=rv&tm=&sq=autocad&aj=revit You may also notice that Autodesk thenselves are looking for REVIT people !! Does that not send a bit of a message ? Get REVIT trained now from > CADclips

Friday, April 20, 2007

Country Style Porch Roof

Thanks to for posting this CADclip on their site.


(click the link above to play the CADclip or right click and "save target as..." to download)
This is a tutorial that can be joyfully applied when you design your dream cottage from making so much money using REVIT !

In this tutorial we learn how to use the 'Roof By Extrusion' to instantly create the roof you see above.

You can further adjust the roof footprint by using the 'cut plan profile' tool.
Oh, I should mention . . I drew the rest of the house in under 5 minutes !

* Click HERE to read about 100's of REVIT jobs *

Wednesday, April 18, 2007

Roof with a Kicker

Thanks to for posting this CADclip on their site.
(click the link above to play or right click and "save target as..." to download the CADclip)
There are a couple ways to create the roof you see above. Both options explained below use two different roofs to accomplish the same task.

Option 1
You use two different roofs with different slopes. You create the lower roof by 'Footprint' then use a 'Cutoff Level' and 'Cutoff Offset' property to eliminating the top part of the roof. Then you create the upper roof by 'Foorprint', size it accordingly and align it vertically within the opening in the lower roof.

Option 2 (prefered method)
You also use two different roofs with different slopes. However for the lower roof we use a model 'Opening' to cut a hole in the roof. Then you create the upper roof by 'Footprint', size it accordingly and align it vertically within the opening in the lower roof. I find this my prefered method as it is simplier and easier to adjust. If you delete the 'Opening' the hole dissappears.

* Click HERE to read about 100's of REVIT jobs *

Wednesday, April 11, 2007

REVIT Diagonal Wall Reveals

Thanks to for posting this CADclip on their site..

REVIT provides a quick and easy way to create Vertical and Horizonatal Reveals and Sweeps but creating diagonal or 'non linear' sweeps and reveals is not so obvious.

Below is a link to a 10 min. CADclip explaining how to create a diagonal or 'non linear' wall reveal or sweep.
Once you go thru this lesson you can apply this method to create all kinds or 'irregular' reveals or sweeps.
((click to play or right click and "save target as..." to download)


* Click HERE to read about 100's of REVIT jobs *