Friday, August 24, 2007

REVIT Structure 2008 Rebar Area Reinforcing

Thanks to for posting this CADclip on their site.

Rebar Rocks !

The new Area Reinforcing system family makes laying out nominal steel a sinch.

Because REVIT tools all work the same it really takes no practice at all.

Select the slab or wall, click the area reinforcing tool and sketch the area outline including openings.

Perhaps use the pick tool and perhaps lock the sketch lines to the slab edges. We've done this before with floors and roofs.

Then simply use the properties to specify the top and bottom rebar size, spacing, bla bla bla and you're done.
This rebar does not show up in 3D but it does show up in all sections.

In true REVIT fashion it parametrically updates everywhere as you make changes in any view.


Below is a link to a great video CADclip showing how Area Reinforcing works.

(click the link above to play the CADclip or right click and "save target as..." to download)

Tuesday, August 21, 2007

First Annual CADclips University

Don't look now but CADclips.com is hosting the first ever


completely Online and Interactive CADclips University (CU).

This November 20, 21, 22, 23.

Click the logo above for more information.


Saturday, August 18, 2007

RAC 2008 Color Schemes Demo


Thanks to for posting this CADclip on their site.

I have to say, I never quite got on the band wagon for the 'Color Fill Schemes' features of REVIT......until now that is.

This is clearly a 'value add' service I now provide. It's so easy it will make your head spin.

It's 'all about' the 'Room' objects. Data in = Data out.

Listen closely now.....you can assign a Color Scheme as a property to the view. SO...Duplicate a view......assign a Color Scheme...bla...bla...bla.

Once you place the room objects (which get created in a single click) you can provide the room information. ie: Room Name, Number, Floor Finish, Base Finish, Ceiling finish, Wall Finish, Department, Occupant. Then that's it......the work is all done.

'Areas' are automatically calculated as you would expect and readily available. You can also use 'room seperators' where walls are not present but rooms change information.

The Color Schemes take over from there and they automatically assign the colors. Then you can re-assign any color you choose.

How would you like it colored up?
By department? By room name? By a set of user created area ranges? It's all up to you.

You can even add new system parameters to rooms through 'project parameters' to add in a field that does not come with the out of the box 'room' object.

Perhaps you want to sort / color a plan by 'lighting type' or 'heating source' or 'type of carpet' 'type of tile' anything you want.

Below is a link to a great video CADclip demonstrating these great Color Fill Schemes features.
(click the link above to play the CADclip or right click and "save target as..." to download)

Thursday, August 16, 2007

REVIT 2008 Shape Editing Roof Tools


Thanks to for posting this CADclip on their site.

REVIT 2008 Architecure and Structure have made leaps of progress in the way of Roof, Floor and Slab tools.
"It's Warped" .....pun intended.
With these new 'Shape Editing' tools (shown below), the sky is the limit. As indicated they work with Roofs, Floors and Slabs.


With the Draw Points, Modify Sub Element, Draw Split Line and Pick Supports tools you can specify the relative elevation of points or edges on a roof, floor or slab.
It works just like the existing toposurface 'points' tool but for floors and roofs.....I think these REVIT people are really listening to us?!


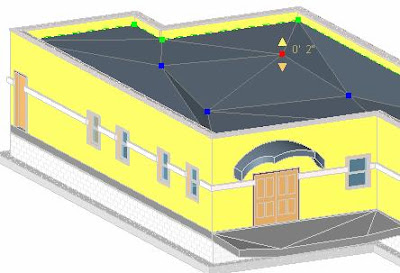
The green nodes are the roof perimeter points, the blue nodes are user created and the red ones are active.
You can even use the good old ctrl+click to select more than one point or edge at a time.
The perimeter roof edges are green dashed lines and not really obvious in the image above.....but trust me, they are there and they are fabulious.
The REVIT Developers R O C K !

You must start with a flat roof, floor or slab and if it's a roof it cannot be attached to another roof but I'm here to tell you "it really works wonders on modeling flat sloped roofs".

You can however 'attach' walls to the top / underside of these warped roofs and floors. You can pick 'beam supports' as shape criteria and the floor, roof, slab will form a split line over the beam and create the slopes. The beam supports themselves can be sloped!


The image below says it all. 4 corners at 4 different elevations.

Outside these great new shape editing tools I really like the ability to provide a 'variable' thickness to perhaps...........a rigid insulation layer of a roof structure!

The image below shows the new Variable thickness option for a roof component layer. Only one layer can be variable as you would expect.


Then you can create a roof (or floor) that slopes on the top but is horizonal on the bottom even if there is only one component.

Below is a section of the result. YEAH !


Perhaps even take it a step further and use the new 'spot elevation' dimension to indicate the surface elevations anywhere you please. YES YES YES !

Below is a link to a great video CADclip explaining how to a model a sloping flat roof with a variable rigid insulation layer.


REVIT - Flat Roof with Tapered Insulation Layer
(click the link above to play the CADclip or right click and "save target as..." to download)

Wednesday, August 08, 2007

REVIT Furniture Cost Schedule Tutorial

Thanks to for posting this CADclip on their site.

I have had a few inquiries about getting 'costs' and 'total costs' quantified in a schedule. It's a little tricky so I thought I would create a video tutorial.

You start by filling in the 'cost' parameter (field) for the family. Then you create a schedule, select the catagory (furniture in this case) and add the fields you want to quantify such as cost, family type and floor level of the furniture item.

Then we use the Grand Total and Total Costs schedule properties to list the information.

Below is a link to a great CADclip explaining how to create a Furniture Schedule and Total up the costs.

(click the link above to play the CADclip or right click and "save target as..." to download)

Thursday, August 02, 2007

REVIT Mass Building Maker Tutorial

Thanks to for posting this CADclip on their site.

Autodesk has provided us with the REVIT Building Maker tools to convert Mass Object faces to Walls, Roofs, Curtain Systems and Floors.........and maintain associativity.

The key is we have to make sure the Mass Object Family is of the Family Category > 'Mass'.

You can maintain two seperate 3D views to manage the Mass object and the new Building Components simultaneously. You can change or alter the Mass object and 'Remake' the building components and watch the model update instantly. It's like magic.

Below is a link to a great CADclip explaining how to use the 'Building Maker' tools.

(click the link above to play the CADclip or right click and "save target as..." to download)