Friday, December 18, 2009

RME - Duct Center Lines in Hidden Visibility

Use REVIT Filters to show Duct Centerlines.
This tip was actually derived from a post at AUGI but I thought it might make a great video for those who are not familiar with Filters and Visibility Graphic Overrides.
The challenge was to get 'round' ducts (or pipes) to display their 'centerlines' when you switch to 'hidden line' visibility because by default the centerlines only show when the view is set to wireframe visibility.
Some say that you should not need to show centerlines but regardless of the camp you are in there is a work around and the lesson learned can be applied to many aspects of REVIT MEP, Architecture or Structure.
Create a 'filter' to grab the 'round ducts' then apply that filter to a plan view and set them to 'Transparent'.
See the CADclip below:

Wednesday, December 16, 2009

Quality Certified REVIT Content at REVIT Market

I just spent some time talking to Michele at REVIT Market and got a great feeling about their business. Michele informed me that getting their 'certified' REVIT stamp of approval on published REVIT rfa files, requires internal human testing.
Very nice in deed.
Check them out.
1000's of Quality Certified REVIT Familes.

Monday, December 14, 2009

REVIT Calculating Standard Roof Slopes by Formula

As I start to get deeper into the conceptual parametric massing families I am coming up with all kinds of cool tips.
Here's a great one.
When you need to constrain reference lines in order to create down stream roof slope parameters for a conceptual mass form as in 3-12, 5-15, 7-12 etc. . . . You don't want the user to have to input the roof slope by an angle. You want to input the slope as a factor of Rise / 12 as shown below. This involves a little trigonometry. Remember the old tan (x) = opposite over adjancent ?
If not have a look at the images just below.
So we know the Adjacent (12) and the user inputs the Opposite (Rise) but the trick is we have to use the 'Inverse Tangent' to get the actual angle in degrees. Otherwise all we get is the Tan of the angle, not the actual angle itself. So the correct term for Inverse Tan is ArcTan which REVIT accomodates as the built in operator atan.
So have a look at the desired constrain resultant and the corrisponding parameter formula below.
The user inputs a Roof Rise of '7' and REVIT calculates the slope angle and adjusts the reference lines (and corrisponding solid form) accordingly.
It is also critical that the 'Slope' parameter is type 'Angle' and the 'Roof Rise' parameter is type 'Number'.
Once this flexes (balances) correctly you simply turn the reference lines into a solid form and Bob's Your Uncle !
Don't forget about the CADclips coined 'Brains', 'Bones', 'Balance' 'Body' approach to Family creation. Be it conceptual massing or conventional Familes.

Friday, December 11, 2009

Canadian Unemployment Rate Starts Improving !

Looks like the Canuck unemplyment rate is also taking a turn for the better !
Yeah !

US Unemployment Rate Starts Improving !

After 31 momths of growing unemployment in the US we see a turn for better times !
Bring it !

Wednesday, December 09, 2009

REVIT Parametric Garage Magic

I realize the sample shown in this demonstration is just a garage building but this took me about 30 minutes to do including the production of the video. Think of what could be generated if you spend several hours preparing the dataset.
Autodesk Resellers . . . . START YOUR ENGINES !
Because this type of technology is going to start selling software.
In this CADclip below I demonstrate how a simple, single parametric massing family can be loaded into a project and with just a few simple clicks can change the parameters of the building and generate various sets of construction documents to include floor plans, elevations, 3D view, cross section and schedules.
We've come a long way BABY !
Before A few clicks after 
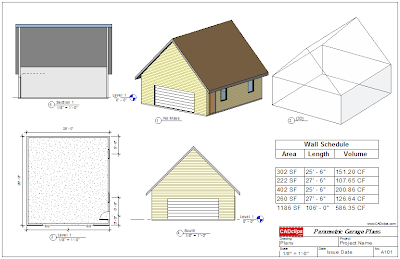
Note the Schedules as well !
Here's the CADclip

Friday, December 04, 2009

REVIT Building Maker Magic

A big frosty Canadian 'Thanks' to my hard working friends at the
For up to date Autodesk information and seasoned support staff these guys are TOPS !
In the CADclip below I demonstarte the Magic of combining Parametric Massing Families with the awesome Building Maker Tools. This is precisely what Carl Bass pointed out in his keynote speech at AU 2009.
Apply some material takeoffs and / or schedules and what used to take a huge amount of time, manpower, energy (and error checking) becomes 100% accurate and INSTANT !
Remember that REVIT stands for 'Revise Instantly' and that's exactly what this CADclip demonstates.
You call it REVIT . . . . I call it MAGIC !
If you are still using vector based CAD instead of BIM (Building Information Modeling) do yourself a BIG favour. Grab a magic wand and follow me to Hogwarts School of REVIT Wizardry !

Wednesday, December 02, 2009

CADclip - Custom Column Family with Chamfer

In the CADclip below I demonstrate how to create the custom column family shown above using the column.rte template, one solid extrusion and one void extrusion.
The only part I did not get time to explain was the 'materials' aspect which I have covered in detail in many other CADclips. Youtube limits videos to 10 minutes and I just could not squezze it in.
To do so:
Create a new instance parameter named 'column material' and make it a 'parameter type > 'Material'. Then associate that parameter with the extruded column's material property. Then load it into a project and change the material as required in the project. Making it an 'instance' parameter allows you to change the material of each inserted column family. Otherwise you can make it a 'type' parameter for more global control.

REVIT - More Samples - Custom Architectural Column

The CADclip below is a sequal to my previous post where I illustrate how you can achieve unlimited versions of a single column family as shown above.

Monday, November 30, 2009

REVIT - Custom Architectural Column with Reveal and Sweep


The CADclip below illustrates a custom REVIT Architectural Column Family that has two type parameters for Column Width and Depth and 7 Instance parameters for Column Material, Sweep Material, Sweep Radius, Sweep Height, Reveal Height, Reveal Vertical Dimension and Reveal Width Dimension.

We start in the project and then open the family to have a look at the guts.

Friday, November 27, 2009

CADclip - REVIT Parametric Massing Study

I am VERY EXCITED about REVIT 2010 Massing and particularly the fact that you can create parametric Loadable Masses.
This effectively allows you to create a parametric prototype of a building, load it into a project, copy it around and manipulate each instance of the mass. Then for each instance of the building Mass you can generate and schedule floors, walls, curtain systems, roofs, floor areas, volumes, surface areas and much more.
It's all demonstarted in the CADclip below !

Wednesday, November 25, 2009

REVIT Void Geometry Trick

Below is a great CADclip on how to work around the fact that you cannot turn off the visibility of void geometry in a family. Instead you just use a parameter (instance) to move the void outside the solid geometry.

Monday, November 23, 2009

REVIT 2010 Massing Study Demo

The CADclip below demonstrates just how slick and simple it is to mass out a building with a curtain system and schedule floor areas, perimeters, volumes and wall surface areas in a matter of minutes.

Friday, November 20, 2009

REVIT - Placing Model Text on a Curved Wall

You cannot place model text on a curved wall but you can place model text on reference planes so the work around is to create a series or reference planes tangent to the curved wall and place one letter on each reference plane. Takes a little bit of time but it works. In the example shown above I named each reference plane according to the appropriate letter ie: ‘M’ ‘O’ ‘D’ ‘E’ ‘L’, then 'set the current reference plane' before placing the model text letter. You can fine tune the ‘plan’ positioning by moving or rotating the reference planes after the letters have been place. You can also nudge the letters around within the reference plane. I changed the ‘material’ of each letter to achieve the color effect. See images below.

Tuesday, November 17, 2009

CADclip - REVIT Family Type Catalog Files

The majority of REVIT families should take advantage of 'Type Catalogs'.
This can be used in all 3 REVIT disciplines as follows:
1. You can quickly create 10's to 100's of family types.
2. You can load only the types you need when you load the family.
3. It keeps the project file size down.
ENJOY !

Tuesday, November 10, 2009

CADclip - Solid Sweep Tips

Have you even come across the error above?
Below is a CADclip on a tip when applying a solid sweep where a straight segment in the sweep path transitions to a non tangent arc. The underlying tip is, if you keep running into the "can't create sweep" where you have a "path" and "profile" that do abide by all the rules, use "sketch path" instead of "pick path" and you find the sweep works ok. I suppose if you ever get the error anytime using solod sweep swith from 'pick' path to 'sketch' path anyway and see if it solves the problem. Always remember to check your work plane as well.

CADclip - Eyebrow Dormer by Sloping Solid Blend

Below are a couple CADclips on creating the Eyebrow Dormer shown above.

Saturday, November 07, 2009

Canadian Unemployment Rate Up to 8.6%

October 2009, Following two months of moderate growth, employment decreased by 43,000 in October, all in part-time jobs. This drop pushed the unemployment rate up 0.2 percentage points to 8.6%. Most of October's employment decline came from retail and wholesale trade, "other services" and natural resources. These losses were partially offset by gains in transportation and warehousing.

US Unemployment Rate Reaches 10.2 %

Currently 11,000,000 (legal workers) out of work. November 06, 2009 In October, the unemployment rate rose to 10.2 percent, the highest since April 1983, and nonfarm payroll employment continued to decline (-190,000). The largest job losses over the month were in construction, manufacturing, and retail trade. OUCH !

Friday, November 06, 2009

AU and Budget Cuts

I've been talking to alot of architectural companies over the last month or so. It appears to me that the cost of attending AU is just not in the budget for most people / companies this year? According to Lynn's talk every year, AU attendance has been going up progressively each year. To the point that the only place that can host AU is Vegas. No longer could Orlando accommodate AU. With wide spread lay-offs, construction halts and overall global economic hard times I will be interested in the attendance numbers this year. The education at AU is second to none, (if you can filter out the crappy sessions). But I wonder if this is going to be the year of the 'fat cats'. I suspect the slow migration to REVIT 2010 isn't helping either. If you will be one of the privileged attendees at AU 2009, be grateful. Very grateful.

Saturday, August 22, 2009

Definition of CAD

CAD or CADD is an extremely generic term that means Computer Aided Design (Drafting).
That's it !
If you use a computer to create design drawings or forms then it's CAD. It doesn't matter if the software uses Parametrics, 2d, 3d, surfaces or solids.
CAD does not stand for 2d or vector based software.
I keep hearing and reading people refer to CAD as an acronym for AutoCAD or the DWG or DGN or even SKP.
For someone to say "The project is done in CAD not BIM". Makes absolutely no sense. You cannot compare the definition of CAD to BIM (Building Information Modeling). CAD is just a big part of BIM.
Spread the word.
CAD means Computer Aided Design. It does not mean 2d or vector based file format.

Friday, July 31, 2009

REVIT Masonry Door Family

I had a request for a Masonry door family with typical 2" x 4" metal tube frame.
Surprisingly REVIT does not have this type of door.
The door for example is 30" x 84" but the M.O. needs to be 34" x 86" when dimensioned.
I basically edited the out of the box Single Flush door to look and behave as shown above.
Here is the family file Masonry Door Family

REVIT Architecture 2010 Scheduling Door Swings


Below is a video tutorial on how to schedule the door 'swing' in a door schedule. This is not fool proof but a very usable workaround as the software does not provide a means to do so.
First we have to make a 'shared parameter' called 'swing'.

Then we add that shared parameter to the door family.

Load the family into a project.

Then we have to 'manually' apply the swing LH or RH to he door instances.

Create a schedule from the View tab of the ribbon.

Select the 'door' category.

Add in the new 'swing' parameter.

Bob's your uncle !
I
t would be nice if when you use the 'flip' control of the door it automatically applies the swing but it does NOT, so due dilligence is required on behalf of the user to check that all doors actually have the correct 'swing' applied.

Update: I have since been informed that my RH, LH designations are incorrect in the video. So I suggest you use your own expertise for the RH, RHR, LH and LHR designations.


CADclips REVIT Videos Here

Wednesday, July 08, 2009

REVIT and US Bill HR 2454

My friends at the CADD Centers of Florida (above) have brought to my attention some extremely interesting information. Being up here in the great white north I was completely unaware of this bill and the impact of it's implimentation across the land.
What this means is all new US buildings are going to have to meet specific energy efficiency requirements. This is where the REVIT suite of products are going to come shining through.
The field is developing so the sooner you learn REVIT and the BIM (building information modeling) it brings to the table the better off you are going to be ! (after we get over this wee ribbon problem that is)
Lines, polylines, ACA walls and the dredded 'Project Navigator' are not going to make the cut.
For more trusted information on REVIT and BIM you can contact Greg at the CADD Centers Of Florida at 1-800-222-4889 ext 127 or email garkin@caddcenters.com
Here is Greg's blog post HR 2454

Tuesday, July 07, 2009

Autodesk uses egg timer approach to releasing software

I am no software developer but programming is done when it's done right? Not when the egg timer goes off.
Could you imagine trying to run a business and setting a 'drop dead date' where your product went out the door whether it was usable or not and then actually followed through with shipping a non usable product?? You'd be out of business or you would change the release date.
I have said it 100 times and I will continue to repeat myself. Autodesk is simply not capable of meeting their own predetermined 12 month subscription / release schedule with either a) stable software or b) something worth upgrading for.
12 months is just not enough time and they have proven it themselves.
Further more the 12 month release schedule is designed 101% for share holders (4 quarters right) and not in the best interest of their revenue generating ‘customers’.
CAD managers definitely do NOT want to have to implement new CAD software every 12 months. A 24 month cycle would be MUCH better. This is precisely how ‘AutoCAD’ has ended up with customers spread across 5 different releases. Autodesk simply cannot keep up to their own 12 month cycle.
So people tell me, 'Well Daryl don't install your subscription paid software then. Just shelf it and it's still cheaper than having to pay extra for out of date upgrades when it finally is ready".
And my answer is always the same 'Yes of course and that's because they set the prices dummy'.
I have made a decent living using, selling and teaching Autodesk products for which I am very thankful but sometimes I just don't understand them.

REVIT 2010 Update 1 Released

Well I really hope this doesn't turn out to be a flash back of AutoCAD R13 (the desaster release).
Remember to read the readme.txt file before doing anything.
It appears they have improved stability when printing to PDF which under certain conditions was actually 'excluding' certain objects in the PDF output. YIKES !

Friday, June 26, 2009

REVIT Ribbon makes my neck hurt

Ok, I have clearly indicated my interest to keep everyone on the same, most current platform of REVIT. That has not changed but OMG the new ribbon 'by design' is NOT geared towards REVIT. The new ribbon by concept just doesn't apply to this type of CAD application.
Seriously, I think the Autodesk developers need to sit down beside a seasoned REVIT user with the old interface and take a lesson on speed and flow. Once you got going with REVIT it really was like music but all the keys need to be in the same place. Now it's like trying to play the piano and all the keys keep moving. Or dare I say 'Whack a Mole'.
Take the copy/ paste buttons for example. If you can manage to stop clicking the regular copy button by mistake (or visa-versa) good luck trying to track those buttons down as they move around like a couple mice on benny's.
I'm not even sure this can be fixed because to do so would be to abandon the ribbon and that's just not going to happen. Right ?
It just goes to show. No matter how many people you have working for you and no matter how much money you have and how large your market share is you can still somehow manage to totally screw up what was already a good thing.
It boggles the mind.
The Ribbon is fine. It's the 'dynamic' part that has to go. How about a more 'static' ribbon?

Thursday, June 25, 2009

AUGI AEC EDGE Publication

Well I received a link to the new AUGI AEC EDGE Publication below and it sure looks yummy. Especially because the issue is titled 'Make Room for REVIT'.
Just thumbing my way through quickly I see tons of juicy information.
WELL DONE !!
Ok, a little dissappointed in the article titled 'A Trainers Perspective, Key Requirements to a Successful BIM Implementation'. More of a product push than a trainers perspective in my opinion. Yes we all know you have to get the company partners and product managers on board. Tell us something we don't know about REVIT training besides your company resume .

Tuesday, June 02, 2009

The Yas Hotel

Ever wonder if anyone actually uses the freeform massing design tools and curtain systems that REVIT (and others) have to offer? I cannot varify which Software Asymptote Architecture uses but this sure looks like the cover of the REVIT DVD case to me. You just have to look to Abu Dhabi, UAE to see just how imaginative the archiotects of today can be. "New York based Asymptote Architecture nears completion of The Yas Hotel project in Abu Dhabi, UAE. The Yas Hotel is a 500-room, 85,000-square-meter complex now under construction. Asymptote was awarded the commission to design the buildings and environs from a closed competition two years ago targeting an opening date of October 30, 2009 to coincide with the Formula 1 Etihad Airways Abu Dhabi Grand Prix".

Thursday, May 28, 2009

REVIT 2010 Opens ArchiCAD IFC File

Above is a 3D Camera view of an ArchiCAD IFC file opened in REVIT Architecture 2010. You do this by using the 'Open' button on the new Application Pull Down Menu. This is not an Import it is 'Opened'. Then you can save it as an RVT file. I got two warnings when I opened the file. One for detaching certain elements and one where I had to click 'delete' on some 'cut out' objects. Then there was some massing objects I could not figure out so I deleted them. All the wall, door, roof, window, furniture objects etc get converted to Families and organized by category in the Project Browser which are usable.
The walls stretch with grips etc. but I could not get them to 'attach' to the roof.
The hosted objects like doors and windows are usable as they are but not really modify-able even if you 'open the family' for editing. Materials do not seem to come through either hence the 'default' material everything is inheriting.
The floor plans look good.
The Levels come in ok and the views all get setup in the Project Browser.
I don't see any annotations or dimension so I will have to check with my ArchiCAD source.
I also opened this IFC in REVIT Structure which looked the same after I did some discipline related changes. So in summary, I am somewhat impressed and depending on what you needed the file for, it is usable as is. I would still re-create my new objects with native REVIT objects. Be it Architectural or Structural objects.

Tuesday, May 26, 2009

Accoustic Accordion Door Curtain Family

I just made this basic REVIT Architecture 2d Accordion / Accordian Door Curtain and thought I would share.
Below is an image of the two families that represent a 10' and 20' accordion door panel. The families are generic line based of category 'door'. Use grips to stretch the door end points. You cannot stretch them beyond their intended maximum length.
When you place one of these families in a plan view, make sure you are set to Work Plane base and not Face based. If you see the stop sign icon that means you are attempting 'face based', so you need to check your option bar.
Below are the 2 2d model families.
If there needs to be some tweeks, let me know.
* We could also turn these into 3D families using the exact same back bone but use an extruded solid instead of symbolic lines.

Tuesday, May 19, 2009

REVIT 2010 - revit rendering library not installed - assetlibrary_base.fbx

For some strange reason my RAC 2010 software started giving the the following warning when I started up my REVIT.
"revit rendering library not installed"
After some minor investigation I noticed that REVIT was looking for the librabry file named "assetlibrary_base.fbx' file in the wrong place.
So under the REVIT 'Options' > 'Rendering' tab "Render Appearance Library Location'
I reset the path from:
'C:\Program Files\Autodesk Revit Architecture 2010\Program\"
TO
"C:\Program Files\Autodesk Revit Architecture 2010\Data\Rendering\assetlibrary_base.fbx'"
AND PROBLEM SOLVED !
YEAH !

Thursday, May 14, 2009

RAC REVIT Architecture 2010 Parking Garage Tutorial

Below is a fun video tutorial that quickly teaches you how to use the floor 'shape editing' tools to create the sloping slabs of a multi-level Parking Garage or 'Parkade'.
Create the flat floor, add some points, change the elevations then copy and paste the floor up to the other 3 levels.
Video TIP: 1. Click the Play button. 2. Then click the 'HD' button, 3. THEN click the 'Full Screen' button . . . . Youtube is still working on this feature.

Friday, May 08, 2009

REVIT 2010 - Orient View

In REVIT 2010 you will notice the 'orient view' tools are gone. Yes, gone from the pulldown menu and gone from the help menu too. That worried me. I searched for the word 'orient' everywhere and NOTHING. Vanished.
I used to use these tools to orient a 3D view to an elevation or plan type viewpoint (Shaded glass looks better in a flat 3d view than a true elevation view).
I just came across the new 2010 solution. . . . . . . . . . . . . . . drum roll please. . . . . . . . . . . . . . . . . . . it's gone.
No just kidding. . . .. now you use the 'View Cube' to orient a 3d view !
Makes sense but just proves another 'clickflow' change that we are going to have to get user to.

Tuesday, May 05, 2009

REVIT Users Unite

I say to all REVIT users "Move to REVIT 2010".
One of the biggest strengths of REVIT has always been 'file compatibility' across consultants. Up to this point it has been a non issue but it's about to show it's ugly (dwg like) face.
If REVIT is actually unstable or impedes productivity to a degree that cannot be recouped, then by all means, stay with 2009.
But to say that you will not move ahead to 2010 on the grounds that the interface is not what you wanted or the features you wanted didn't make this release I say to you "Move to REVIT 2010". To do otherwise is to contribute to the beginning of the end of one of REVIT’s best assets.
If you think the new ribbon is slowing down your productivity try dealing with a different, non-compatible, version of REVIT.
To split up the REVIT masses weakens us as a community. We must band together like '300' and shield ourselves from eminent file compatibility issues !
Join me now and embrace this new 2010 interface !
(even though you cannot rearrange the icons on the quick access toolbar)

AutodeskCares@Autodesk.com

April 23, 2009 A message from the Autodesk Building Industry Director about the Revit 2010 release. The following message is from Nicolas Mangon, the Building Industry Director at Autodesk regarding the recent release of the 2010 Revit products: We were excited to ship the 2010 version of Revit last week. In an effort to reduce the learning curve and increase productivity we introduced a new user interface this year that allows users to leverage their skills and knowledge across Autodesk products. Over the past few years you’ve consistently told us that the Revit user interface was dated. In fact, the methods used in the old user interface such as, menus, toolbars, the design bar, and options bar were no longer scalable to support current and planned future product enhancements. We’ve also heard that the most significant barriers to Revit adoption are the availability of trained users and the cost of training new users. For these reasons, our focus in developing a new user interface for Revit was on the creation of an extensible UI framework that is easier to learn and to use. By adopting a ribbon style approach, we accelerate learning by allowing new users to apply concepts learned elsewhere. Enhanced tooltips make discovering tools and understanding their use easier, and the quick access toolbar allows you to place the tools you use most frequently in a convenient location. The process for developing the UI was highly comprehensive and included over 18 months of iterative design that incorporated user testing and performance benchmarking. In early testing, 86% of Beta testers responding to a survey said they would recommend this version of Revit to a friend, and according to Usability Sciences (an independent testing firm): “In general, users quickly adjusted to the interface and were able to complete most tasks with relative ease and speed.” You can learn more about the design and development methodology here on Inside the Factory. There are a variety of resources that have been made available to help users transition to the new user interface. For example, Revit Architecture has integrated the following learning tools directly into the product: an interactive user interface overview, a user interface video tour, and a menu location tool to assist users in locating commands that may have been moved. The video tour can be accessed here: http://usa.autodesk.com/adsk/servlet/item?siteID=123112&id=12945494. This new UI is part of a larger initiative at Autodesk to make it easier for you to transfer your knowledge from one product to others, making it easier to choose the best tool for the task at hand and to become productive quickly. We’re also working on making it easier to move data between applications and to enhance the visualization capabilities of our products to enable new and exciting simulation opportunities that will increase the value of your designs. In addition to the new UI, the 2010 release of Revit has some very important enhancements. The new conceptual design tools in Revit Architecture, integrated Heating and Cooling Load Analysis within Revit MEP, slanted columns in Revit Structure, and support for 64 bit hardware across the Revit platform. We also made enhancements to the API that will allow 3rd party developers to create functionality related to analysis, process automation, fabrication, cost estimating, etc. Other non-visible investments in the platform include technologies that will allow Revit to support global trends such as Sustainable Design, Large Team Workflow and dispersed teams, Fabrication, and large and complex models, etc. Your perspective on these issues is very important to us, and we are taking a new look at how we communicate with you about your needs and requests for enhancements. For example, we are going to better align the AUGI wish list voting process with our development cycle so we can more effectively incorporate your requests. We’re already planning for ways to incorporate the current wish list items in the next release of Revit. Please stay tuned for more details about this over the coming months. Finally, we’ve created a new email alias for you to share your ideas and suggestions about Revit directly with the product team: Autodeskcares@autodesk.com. Thanks for your continuing support and passion for Revit Nicolas Mangon Building Industry Director

Monday, May 04, 2009

CADclip - REVIT Walk Through Going up Stairs

I have been meaning to make a quick video on the Walk Through tools for a long time, so here's my latest.
I think it's still best to 'create' the walkthrough in a plan view with other views open. Then you can edit the walkthrough in section. plan, elevation or 3D views.
You can edit the camera view and target but you can also edit the Path and the camera 'height' at key frames, in a 3D view as shown in the video.
You will notice that you get more edit options at the 'key frames' then at the intermittent frames. I also suggest you lower the default '300' frames to around 20,40 60 etc....while editing. Then as a final product or AVI export you can bump the 'frames' back up to 300 or more.
Video TIP:
1. Click the Play button.
2. Then click the 'HD' button,
THEN click the 'Full Screen' button . . . .
Youtube is still working on this feature.

Thursday, April 16, 2009

REVIT Architecture and Structure 2010 has Arrived !

REVIT Architecture and Structure 2010 are now available for download at the Autodesk subscription center.
Let the fun begin !
You may want to set aside a couple hours to download, extract and install but I have a feeling it is worth it !

Wednesday, April 15, 2009

REVIT Family Tip for Mirroring

Using the 'mirror' tool (or even copy tool) in the family editor can cause unexpected results. This can be a real boobie-trap because you may never realize that it was that original 'mirror' you did way back when that is causing the problem. As a novice you may simply give up and never figure out what is causing the problem. So here is the tip. * As a beginner using the family editor, avoid using the mirror (or copy) tool if you can or at least be aware of what it does. You are actually safer to draw all of the objects one at a time including sketch lines. Plus. . . .you need practice. Be aware that when you mirror a solid or void the 'work plane' of the original object is maintained on the new object. Better off to draw a new object. Seriously. When you mirror a solid or void that has constraints, the constraints may have to be recreated on the new object. Try not to mirror sketch lines at all. Sketch lines can be nicely tied to reference lines (even without a constraint) but a mirrored sketch line will behave differently than a newly created sketch line with regards to nearby reference planes. Draw new objects.
I am not saying you cannot accomplish what you want with the mirror (or copy) tool but I am saying that mirrored (and copied) objects do NOT behave the same as a newly created objects. Do yourself a favour and create the objects one at a time and you will find the road a little less bumpy.
When you're ready to do a little 4x4'ing then you can head for the outback but I always end up looking for that smooth road again.

REVIT Families - Bones, Brains, Balance and Body

Steve Stafford recently posted a suggested method of 'naming' the three main processes involved in creating families while in the 'family editor'. Made perfect sense. He reduced the family creating process to Bones, Muscle, and Skin. Reducing is good. I started using that terminology because it helps people get around the most important 'process' much easier and then allows valuable energy to be applied on making cool families.
Steve's original suggested process naming:
Bones = Reference Planes
Muscle = Dimensions, Labels/Parameters, Automatic Sketch Dimensions
Skin = Solids/Voids and Symbolic Linework
So now, for me it has evolved to become the 'Four B's' or simply put '4B' approach.
Here is my new (ever evolving) family creating 4B approach and it is VERY important to maintain the order in which it is laid out.
Bones = Family Template and Category, Named and Unnamed Reference Planes, Reference Lines, Reference Levels
Brains = Dimensions, Labels/Parameters (w/formulas), Automatic Sketch Dimensions, Pins, Arrays, (w/labels), Groups, Nested Families
Balance = Flex the Brains and Bones (and keep flexing)
Body = Solids/Voids, Model Lines, Symbolic Lines, Masking Regions, Annotation and Detail Components . . .
So when you want to start making familes you can use the obove approach (in that order) and it will help make life much easier. I think most people are like me and they get excited when making familes and jump ahead to the 'Body' part right away and that causes problems. RESIST !
Thank you Steve . . . . just point me in the right direction.

Friday, April 10, 2009

REVIT Architecture 2010 New Features and Images

REVIT Architecture has come a long way since I started using it in 5.0. A steady upward curve of advancement in parametric design and building information modeling. Not to mention it's so fun to use every day. Well the fun is about to kick into full stride and everyone is going to be competing for the Dubai, UAE sky line using these new concept design tools.
Below are a few snapshots of what is to be released on April 16th.
...........................................
First off we have the 'Application Window' which allows us to open, save etc but it also allows us to comtrol our Recent Files history. We can 'Pin' certain files to always stay in the recent files listing and we can also sort and organize the recent files history. Thank you.
Place your favorite tools on the 'Quick Access' toolbar.
...........................................
Some 'Ribbon' snapshots show below. The Ribbon has replaced the Design bar and the options bar and the pull down menu ! (the Project Browser remains the same). And unlike AutoCAD 2010 REVIT does NOT have the option to set the interface back to 'Classic'. It's the new interface I have personally been wishing for so I am excited to dig in deep and see what treasures lie ahead ! This is just the facelift REVIT needed in my opinion. As you select different tools the Ribbon reacts accordingly. If you are familiar with Office 2007 then you recognize the format and dancing to the Microsoft tune.
...........................................
Now because the REVIT developers are so smart they even built in a "Where the #%@ is my command" tool. This is something we will use and appreciate in order to to bridge the gap between the old interface and the new interface. Show REVIT where the old tool was and it will show you how to find it in the new Ribbon.
...........................................
REVIT also has extended help information instantly available with a delayed 'hover' over a tool.
...........................................
I have no images for this new feature but you can now add 'Connectors' to Electrical, Piping and HVAC Families. This is huge news for MEP.
...........................................
The conceptual tools are in center ring on this RAC release.
Make a massing family and then 'Create Shapes' and add intermitant profiles and use Xray mode to manipulate nodes and then add and refine a surface and then swap different massing types like design options. It's amazing. The Create Shape and supporting tools are only available for Massing objects.
That's it for now.
Stay tuned for lots more REVIT 2010 information and some exciting new streaming video tutorials.

Thursday, April 09, 2009

REVIT Structure 2010 New Features and Images

Well REVIT Structure and Architecture should be flying off the shelves starting April 16th.
YEAH !
Below are a few items of interest on the new RST 2010 software.
----------------------------
For integrated RST output it seems it's all about the 'Extensions'. This is not new news to existing RST users.
Extensions are only available to subscription users but I think most REVIT users are on subscription anyway.
Extension are for the most part, 3rd add-ons or APIs.
REVIT has had an Extension Manager for a while now below is what it looks like now.
----------------------------
Below is the 'Beam to Column connection' Extension.
It allows you to configure the geometry involved, plates, brackets, bolts, stiffeners and welds . . . . and it allows you to save it as a 'Family' for future use. This is only avalable to Beam /Column connections. No current Beam to Beam connections allowed with this tool. COOL !
----------------------------
There is also a much anticipated 'Bridge' extension.
This extension allows you to configure the bridge profile, deck, abutments, piers and railings.
----------------------------
Below we see what can be created within seconds with the Create Form, Divide Surface and Triangle Surface Pattern tools. REVIT's 'Create Form' tool in general is a completely independant and entirely new set of super-duper amazing tools. See image below. ---------------------------- Then of course there is the much talked about 'Ribbon. The Ribbon interface has arrived with REVIT and unlike in AutoCAD there is no 'Classic' display option to go back to the old interface. So get used to it ! If you are familiar with the latest MS Office interface you should recognize the format as it appears Microsoft is driving this change in design. The Ribbon is context sensative so during a command sequence it's constantly adapting and replaces the old 'Options Bar'. The Ribbon is customizable and you can also add your own hand picked commands to the 'Quick Access' bar. This handi toolbar behaves much like the Microsoft 'Quick Launch' toolbars on the task bar. Right click a tool and click 'Add to Quick Access toolbar' and the tool will be added and waiting just like on a . . . . . . . drum roll . . . . . Palette ! ---------------------------- That's all for now, stay tuned for lots more exciting videos and tutorials here at REVIT Rocks !