Friday, January 29, 2010

REVIT Wood Framing Walls Extension


Please see the CADclip Video Tutorial at the bottom of this post.

Also, a big REVIT Rocks 'Thank You' to these four sites for their generous exposure:

REVITCITY - (great discussion)

The REVIT KID (fairly new on the block but in a word ...'SMART')

Cadalot - REVIT Structure Learning Curve (a relentless hunt for learning)

CADDIGEST (oodles and oodles of links to free tutorials)
We'll start with the images : )

In this tutorial we are going to introduce you to the new and exciting REVIT Wood Framing Walls Extension available for free to all REVIT subscription members.
Thanks to > REVIT Learning Curve for bringing this app to my attention.
It's taken me a solid 15-20 hours of tinkering before I could get it to create what I wanted in a single attempt, however there were MANY failed attempts.
There are a few things that need to get 'fixed' with this REVIT extension before it's 100% ready for the market but it has amazing potential.
I went from being excited to being dissappointed no less than 5 times.

Review Summary:
This extension is not 100% ready for market use YET . . . but it has huge potential. It works . . . but it is cumbersome to use and has a few fundamental glitches that need to get fixed after you get it up and running. Make sure you have the wood material loaded and make all walls load bearing before you start (otherwise it will prompt you to make them load bearing).

Number 1 problem is the ability for this app. to differentiate between 'wall thickness' and 'core thickness'. It places the studs 'centered' in the wall thickness where we really want the studs centered in the 'core thickness'. This is pretty much a show stopped right there. However I have a feeling it's not a difficult fix. Once that gets done we're off to the races. This observation is readily visible in the app. dialog box.

Number 2 problem (as I discovered) is when you try to duplicate the O.T.B. structural framing member families to hard code dimensions to the framing cross section ie: 2 x 4 = 1 7/8" x 3 7/8" (38 x 89) etc. The app. seems to prefer using 'User defined framing parameterization' framing profiles rather than the 'revit project active families'. The actual naming of these two options is confusing to say the least because the user defined profiles are actually the ''revit project active families'' and not the one that says 'user defined'. Either way it causes down stream problems unless you just let the app. make the profiles automatically based on the wall thickness. (Tricky one to explain in words.)
Number 3 problem is the tedious process of applying the framing specifications to each and every wall and opening. There is no way to specify the framing (headers, sills, kings) to 'all selected door openings' or 'all selected window openings'. You have to go through each and every wall in the project. I soon discovered that with a simple 1200 sq ft bungalo it took me FOR EVER and you can see from the posted images I still missed some walls because the top plates are rotated the wrong way (or shall I say . . . the DEFAULT way). Who uses a top plate rotated vertically . . . . come on people . . . get with the building code).

Number 4 problem is the fact that you need to 'rotate' the opening headers and sills even though the image shows it oriented the right way. Seeing as the header has Profile 1 and profile 2 this can be very confusing as you try to bumble you're way through this learning process. The default profiles should at the very least get placed as seen in the dialog box.

Number 5 problem is Tee connections. These show up ramdomly where there is no Tee and don't get placed where there are Tee's.

Number 6 problem is wall corner connections. They just don't cleanup properly at the top and bottom plate consistantly. I tried playing with my wall corner joins with no better results.
Number 7 problem is 'units' . OMG The app. uses the Project Units and converts everything to the Units 'round off' of say /32 or /8 etc. AND you cannot enter units in decimal form as in 1.5". It simply will not allow you to vear from the project units. If you specify 1 7/8" it will convert that to say . . . 1 28/32". Weird but true.
What you end up doing is defining each wall framing configuration and then deleting all the framing it creates and then doing it again. . . .and again . . . and again . . . and yes again . . . until it FINALLY gives you what you want. In he mean time you may find it creates duplicate framing members occupying the same space or creating no framing at all, but thinks it is actually there. The thing is the framing configuration seems to be saved somewhere externally (and not as a property of the wall) and you can delete the framing entirely, save and close the file, open the file back up and the wall will remember how you wanted it framed.
It will allow you to tweak the framing by using the grips to stretch a single framing member but it causes problems too.
In the end this app. has SUPER potential but it's really only 75% complete at best. . . . in true Autodesk fashion (even though this is not their app. (which is another topic altogether) ) they'll let us test it out and then report back with the bugs (DOH!) .
(17.5 hrs @ $97.25/hr = $1701.87 . . . thank you Autodesk . . . you can contact me for my paypal address. : ) )
Gotta run . . . the kids are up . . . : ) . . . . have a look at the CADclip below for a more graphical explanation. Comments are always welcomed. 


CADclips REVIT Videos Here

Tuesday, January 26, 2010

REVIT Good Bubble Bad Bubble

Good Bubble !
Bad Bubble !
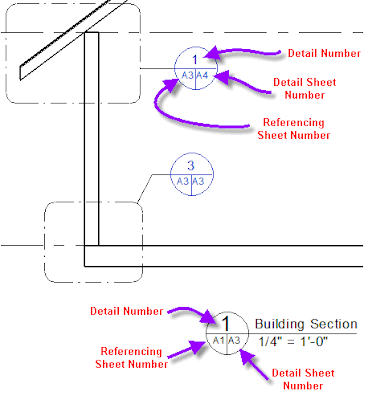
By default REVIT uses View, Callout and Section tags (bubbles) that do not provide industry standard forward and backward referencing. I prefer the Good Bubble image.
Below is a sketch with a little more detail on the good bubble ingredients.
Below is a CADclips on how to swap the Bad Bubbles out for the Good Bubbles !

Thursday, January 21, 2010

Adding Cost and Currency to REVIT Schedules

Below is a CADclip on adding Currency ($$) and cost to REVIT Material Takeoffs and Schedules.

Most people can create a good material takeoff and or quantity schedule in REVIT and get totals and grand totals. But bridging the gap to costing and the almighty $ sign is tricky.

For many regualr 'schedules' all you have to do is add in a 'cost' as part of the instance or type parameters. But 'material takeoff's' are a little different.

If you create a foundation 'material takeoff' schedule that tells you that you have 1500 cubic feet (CF) of 'cast in place concrete' and you know your cost is $15 / CF then you should be able to formulate that overall cost. But you will run into a road block > error: Inconsistant Units

The problem occurs when you try to use the 'currency' unit (dollar) and the 'volume' unit (CF) together in the same REVIT schedule field formula. You will get an 'Inconsistant Units' error.

The answer is to create an intermitant variable that translates the volume unit to real number units. Then multiply that number by the cost / unit and Bob's your uncle.

For 30+ free REVIT Lab Exercises go to this post > CADclip Labs

Set the Pixel width to 720p for HD video quality.

Here's the CADclip.

Tuesday, January 19, 2010

REVIT Architecture Lab Exercise Videos

Below you will find a series of free CADclip 'Lab Exercises' on how to model and document the drawings for a double car garage. This is a great training aid / resource for anyone who is teaching REVIT or learning to use REVIT (Architecture or Structure).

There are 31 videos included within the single playlist embedded below which walk you through the exercises step by step.
The playlist starts at Lesson 1 and moves on.
Remember, these are 'Lab Exercises' and not a Tutorial. They are best utilized after getting familiar with REVIT. For more detail tutorials visit CADclips.

We start with grid lines and levels, then walls, doors, windows, footings and a roof. Then a sloping slab and notched foundation wall at the overhead door. Then we put the plans, elevations, section on a sheet and annotate them for documentation. We create Schedules and Material Takeoffs that include Totals and Costs.

We also constrain and align the walls, grids, roof and slab to establish a nice neat parametric project. Move a grid line and the entire project updates right down to the sheets, schedules and costs.
Set the Pixel width to '720p' for HD video quality.


Monday, January 18, 2010

Group REVIT Schedule Headers

Did you know you can edit the 'header' information in REVIT Schedules and 'Group' (or ungroup) columns as indicated above?
It's easily demonstarted in the 1.5 minute CADclip below.
Set the Pixel width to '720p' for HD video quality.

Wednesday, January 13, 2010

50% Off all REVIT Video Tutorials

CADclips is offering 50% off all REVIT Video Tutorials until the end of January 2010.
Enter the coupon code BIM then click the [Update Cart] button to see the discount as illustrated above.
Here is the CADclips Store link.
You can browse REVIT topics on the left hand side.

Tuesday, January 05, 2010

REVIT Parametric House Magic

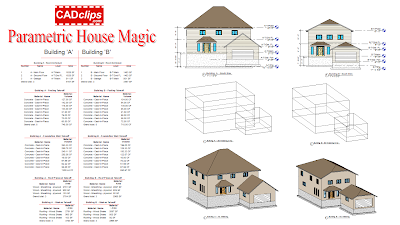
Below is a great CADclip demonstrating the power of REVIT, BIM and Conceptual Massing.
I navigate the entire demonstration from a single sheet view of a project.
The project contains one parametric conceptual mass setup to control the shape of a basic two storey house and attached garage.
Then within one project, using Phases and Scope boxing you can create unlimited versions of the same basic house shape but with different dimensions, floor levels, roof slopes and MATERIAL TAKE-OFFS !
You can even have different wall, window and door types per instance.
Control each version of the same model from the associated conceptual mass.
Click the conceptual mass and change the foundation depth, floor to ceiling height, floor thickness, garage width or length, house width, length or height and the entire model updates and so do all the views and the material take-offs !
With a little more work you could sit down with a client, change a few dimensions and print out unlimited versions of construction documents and corrisponding material take-offs. All with just a few clicks.
I think they call this B I M !!
Here is the process used to create what you see in the CADclip below: 1. Create a conceptual Mass Family with parametric constraints. 2. Load it into a project. 3. Use the building maker tools to skin the conceptual mass with walls etc.
4. Place and Constrain the doors and windows to the wall corners and intersections. 5. Make a copy of both the mass and the associated walls, roofs etc. 6. Create and assign phases to seperate the two models. 7. Schedule the material take offs based on phase and material type. 8. Make parametric changes to one of the masses aand then tell the walls, floors, roofs to update to the new mass faces. 9. Place the views on a sheet. 10. You now have multiple parametric models with associated material takeoffs.
Here's the CADclip !
Set the Pixel width to '720p' for HD video quality.

Friday, December 18, 2009

RME - Duct Center Lines in Hidden Visibility

Use REVIT Filters to show Duct Centerlines.
This tip was actually derived from a post at AUGI but I thought it might make a great video for those who are not familiar with Filters and Visibility Graphic Overrides.
The challenge was to get 'round' ducts (or pipes) to display their 'centerlines' when you switch to 'hidden line' visibility because by default the centerlines only show when the view is set to wireframe visibility.
Some say that you should not need to show centerlines but regardless of the camp you are in there is a work around and the lesson learned can be applied to many aspects of REVIT MEP, Architecture or Structure.
Create a 'filter' to grab the 'round ducts' then apply that filter to a plan view and set them to 'Transparent'.
See the CADclip below:

Wednesday, December 16, 2009

Quality Certified REVIT Content at REVIT Market

I just spent some time talking to Michele at REVIT Market and got a great feeling about their business. Michele informed me that getting their 'certified' REVIT stamp of approval on published REVIT rfa files, requires internal human testing.
Very nice in deed.
Check them out.
1000's of Quality Certified REVIT Familes.

Monday, December 14, 2009

REVIT Calculating Standard Roof Slopes by Formula

As I start to get deeper into the conceptual parametric massing families I am coming up with all kinds of cool tips.
Here's a great one.
When you need to constrain reference lines in order to create down stream roof slope parameters for a conceptual mass form as in 3-12, 5-15, 7-12 etc. . . . You don't want the user to have to input the roof slope by an angle. You want to input the slope as a factor of Rise / 12 as shown below. This involves a little trigonometry. Remember the old tan (x) = opposite over adjancent ?
If not have a look at the images just below.
So we know the Adjacent (12) and the user inputs the Opposite (Rise) but the trick is we have to use the 'Inverse Tangent' to get the actual angle in degrees. Otherwise all we get is the Tan of the angle, not the actual angle itself. So the correct term for Inverse Tan is ArcTan which REVIT accomodates as the built in operator atan.
So have a look at the desired constrain resultant and the corrisponding parameter formula below.
The user inputs a Roof Rise of '7' and REVIT calculates the slope angle and adjusts the reference lines (and corrisponding solid form) accordingly.
It is also critical that the 'Slope' parameter is type 'Angle' and the 'Roof Rise' parameter is type 'Number'.
Once this flexes (balances) correctly you simply turn the reference lines into a solid form and Bob's Your Uncle !
Don't forget about the CADclips coined 'Brains', 'Bones', 'Balance' 'Body' approach to Family creation. Be it conceptual massing or conventional Familes.

Friday, December 11, 2009

Canadian Unemployment Rate Starts Improving !

Looks like the Canuck unemplyment rate is also taking a turn for the better !
Yeah !

US Unemployment Rate Starts Improving !

After 31 momths of growing unemployment in the US we see a turn for better times !
Bring it !

Wednesday, December 09, 2009

REVIT Parametric Garage Magic

I realize the sample shown in this demonstration is just a garage building but this took me about 30 minutes to do including the production of the video. Think of what could be generated if you spend several hours preparing the dataset.
Autodesk Resellers . . . . START YOUR ENGINES !
Because this type of technology is going to start selling software.
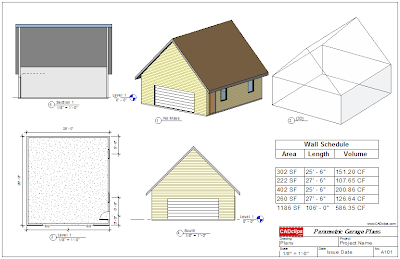
In this CADclip below I demonstrate how a simple, single parametric massing family can be loaded into a project and with just a few simple clicks can change the parameters of the building and generate various sets of construction documents to include floor plans, elevations, 3D view, cross section and schedules.
We've come a long way BABY !
Before A few clicks after Note the Schedules as well !
Here's the CADclip

Friday, December 04, 2009

REVIT Building Maker Magic

A big frosty Canadian 'Thanks' to my hard working friends at the
For up to date Autodesk information and seasoned support staff these guys are TOPS !
In the CADclip below I demonstarte the Magic of combining Parametric Massing Families with the awesome Building Maker Tools. This is precisely what Carl Bass pointed out in his keynote speech at AU 2009.
Apply some material takeoffs and / or schedules and what used to take a huge amount of time, manpower, energy (and error checking) becomes 100% accurate and INSTANT !
Remember that REVIT stands for 'Revise Instantly' and that's exactly what this CADclip demonstates.
You call it REVIT . . . . I call it MAGIC !
If you are still using vector based CAD instead of BIM (Building Information Modeling) do yourself a BIG favour. Grab a magic wand and follow me to Hogwarts School of REVIT Wizardry !

Wednesday, December 02, 2009

CADclip - Custom Column Family with Chamfer

In the CADclip below I demonstrate how to create the custom column family shown above using the column.rte template, one solid extrusion and one void extrusion.
The only part I did not get time to explain was the 'materials' aspect which I have covered in detail in many other CADclips. Youtube limits videos to 10 minutes and I just could not squezze it in.
To do so:
Create a new instance parameter named 'column material' and make it a 'parameter type > 'Material'. Then associate that parameter with the extruded column's material property. Then load it into a project and change the material as required in the project. Making it an 'instance' parameter allows you to change the material of each inserted column family. Otherwise you can make it a 'type' parameter for more global control.

REVIT - More Samples - Custom Architectural Column

The CADclip below is a sequal to my previous post where I illustrate how you can achieve unlimited versions of a single column family as shown above.

Monday, November 30, 2009

REVIT - Custom Architectural Column with Reveal and Sweep


The CADclip below illustrates a custom REVIT Architectural Column Family that has two type parameters for Column Width and Depth and 7 Instance parameters for Column Material, Sweep Material, Sweep Radius, Sweep Height, Reveal Height, Reveal Vertical Dimension and Reveal Width Dimension.

We start in the project and then open the family to have a look at the guts.

Friday, November 27, 2009

CADclip - REVIT Parametric Massing Study

I am VERY EXCITED about REVIT 2010 Massing and particularly the fact that you can create parametric Loadable Masses.
This effectively allows you to create a parametric prototype of a building, load it into a project, copy it around and manipulate each instance of the mass. Then for each instance of the building Mass you can generate and schedule floors, walls, curtain systems, roofs, floor areas, volumes, surface areas and much more.
It's all demonstarted in the CADclip below !

Wednesday, November 25, 2009

REVIT Void Geometry Trick

Below is a great CADclip on how to work around the fact that you cannot turn off the visibility of void geometry in a family. Instead you just use a parameter (instance) to move the void outside the solid geometry.

Monday, November 23, 2009

REVIT 2010 Massing Study Demo

The CADclip below demonstrates just how slick and simple it is to mass out a building with a curtain system and schedule floor areas, perimeters, volumes and wall surface areas in a matter of minutes.

Friday, November 20, 2009

REVIT - Placing Model Text on a Curved Wall

You cannot place model text on a curved wall but you can place model text on reference planes so the work around is to create a series or reference planes tangent to the curved wall and place one letter on each reference plane. Takes a little bit of time but it works. In the example shown above I named each reference plane according to the appropriate letter ie: ‘M’ ‘O’ ‘D’ ‘E’ ‘L’, then 'set the current reference plane' before placing the model text letter. You can fine tune the ‘plan’ positioning by moving or rotating the reference planes after the letters have been place. You can also nudge the letters around within the reference plane. I changed the ‘material’ of each letter to achieve the color effect. See images below.

Tuesday, November 17, 2009

CADclip - REVIT Family Type Catalog Files

The majority of REVIT families should take advantage of 'Type Catalogs'.
This can be used in all 3 REVIT disciplines as follows:
1. You can quickly create 10's to 100's of family types.
2. You can load only the types you need when you load the family.
3. It keeps the project file size down.
ENJOY !

Tuesday, November 10, 2009

CADclip - Solid Sweep Tips

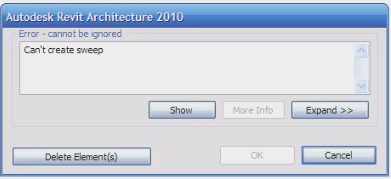
Have you even come across the error above?
Below is a CADclip on a tip when applying a solid sweep where a straight segment in the sweep path transitions to a non tangent arc. The underlying tip is, if you keep running into the "can't create sweep" where you have a "path" and "profile" that do abide by all the rules, use "sketch path" instead of "pick path" and you find the sweep works ok. I suppose if you ever get the error anytime using solod sweep swith from 'pick' path to 'sketch' path anyway and see if it solves the problem. Always remember to check your work plane as well.

CADclip - Eyebrow Dormer by Sloping Solid Blend

Below are a couple CADclips on creating the Eyebrow Dormer shown above.

Saturday, November 07, 2009

Canadian Unemployment Rate Up to 8.6%

October 2009, Following two months of moderate growth, employment decreased by 43,000 in October, all in part-time jobs. This drop pushed the unemployment rate up 0.2 percentage points to 8.6%. Most of October's employment decline came from retail and wholesale trade, "other services" and natural resources. These losses were partially offset by gains in transportation and warehousing.