
This blog is provided for All Things REVIT.
Wednesday, November 12, 2008
HOK chooses CADclips Training Videos
I happen to know first hand that after certain research and testing Autodesk REVIT Award Winning HOK has chosen CADclips Training Videos to be part of their training repetoir(e) .
I say, it goes to show that 'knowledge transfer' methods are definitely changing 'for the better' and HOK is using CADclips training videos as part of that new initiative.
Can you imagine trying to keep 1000's of people trained and productive during this transfer to REVIT and BIM ? There WAS no affordable way to get everyone trained and then keep them all trained. CADclips has not only bridged that gap they have 'removed the gap'.

REVIT Blog in Argentina

REVIT Argentina
'Primer blog Argentino acerca de Revit Architecture'
Above is a link to my friend Leonardo Aita's REVIT Blog in Argentna.
Saturday, October 04, 2008
Free REVIT Video Tutorial Series on Custom Family Creation
Hot off the press !
 I thought I would share my latest free video tutorial series with the world.
I just put together a sweet REVIT Training Video series that I'm sure most of you will find of value.
This is great for all levels of REVIT users who want to learn some cool things about making families.
In the videos I create an architectural beam (using the linear model template) with some abutments (for lack of better word).
The lessons learned over the course of these 7 videos should get the wheels turning. Then those lessons can be used to further develop your own custom REVIT family ideas.
This is a well organized, step by step process that will (hopefully) get you on the right track in making your own exciting new REVIT families.
Here's what you will learn about:
- The linear model family and associated template
- View Range
- Parameters and parameter types
- Reference Planes
- Dimensions to parameters
- Solid extrusions
- Sketching
- Work Planes
- Aligning, locking and constraining the solid geometry
- Flexing the model in the family editor and in the project
- Using the very cool Yes / No parameter to control individual family geometry visibility
- Integrating Model Lines with your solid geometry
- Using the Linework tool to get sneaky and fine tune the family within the project
- Mental Ray Materials
- Rendering
- Adjusting the rendered image
- Saving and exporting the Rendered image.
. . . lots more, but let's get at it . . . .
Click the link to play the video or right click and 'save target as . .' to download. Enjoy !
Lesson 1: The Completed Beam Family Introduction
www.cadclips.com/downloads/RAC-ARCH-BM-FAMILY-1-BEAM-FAMILY-INTRO.wmv
Lesson 2: Parameters and Reference Planes
www.cadclips.com/downloads/RAC-ARCH-BM-FAMILY-2-PARAMETERS-AND-REFERENCE-PLANES.wmv
Lesson 3: Modeling the Main Beam and Flex
www.cadclips.com/downloads/RAC-ARCH-BM-FAMILY-3-MODEL-THE-MAIN-BEAM-AND-FLEX.wmv
Lesson 4: Modeling the Abutments and Flex
www.cadclips.com/downloads/RAC-ARCH-BM-FAMILY-4-MODEL-THE-ABUTMENTS-AND-FLEX.wmv
Lesson 5: Using Yes / No Parameters to Control Object Visibility
www.cadclips.com/downloads/RAC-ARCH-BM-FAMILY-5-YES-NO-PARAMETERS-TO-CONTROL-VISIBILITY.wmv
Lesson 6: Use Model Lines and the Linework Tools
www.cadclips.com/downloads/RAC-ARCH-BM-FAMILY-6-MODEL-LINES-AND-LINEWORK-TOOL.wmv
Lesson 7: Mental Ray Materials and Rendering
www.cadclips.com/downloads/RAC-ARCH-BM-FAMILY-7-MATERIALS-AND-RENDERING.wmv
I thought I would share my latest free video tutorial series with the world.
I just put together a sweet REVIT Training Video series that I'm sure most of you will find of value.
This is great for all levels of REVIT users who want to learn some cool things about making families.
In the videos I create an architectural beam (using the linear model template) with some abutments (for lack of better word).
The lessons learned over the course of these 7 videos should get the wheels turning. Then those lessons can be used to further develop your own custom REVIT family ideas.
This is a well organized, step by step process that will (hopefully) get you on the right track in making your own exciting new REVIT families.
Here's what you will learn about:
- The linear model family and associated template
- View Range
- Parameters and parameter types
- Reference Planes
- Dimensions to parameters
- Solid extrusions
- Sketching
- Work Planes
- Aligning, locking and constraining the solid geometry
- Flexing the model in the family editor and in the project
- Using the very cool Yes / No parameter to control individual family geometry visibility
- Integrating Model Lines with your solid geometry
- Using the Linework tool to get sneaky and fine tune the family within the project
- Mental Ray Materials
- Rendering
- Adjusting the rendered image
- Saving and exporting the Rendered image.
. . . lots more, but let's get at it . . . .
Click the link to play the video or right click and 'save target as . .' to download. Enjoy !
Lesson 1: The Completed Beam Family Introduction
www.cadclips.com/downloads/RAC-ARCH-BM-FAMILY-1-BEAM-FAMILY-INTRO.wmv
Lesson 2: Parameters and Reference Planes
www.cadclips.com/downloads/RAC-ARCH-BM-FAMILY-2-PARAMETERS-AND-REFERENCE-PLANES.wmv
Lesson 3: Modeling the Main Beam and Flex
www.cadclips.com/downloads/RAC-ARCH-BM-FAMILY-3-MODEL-THE-MAIN-BEAM-AND-FLEX.wmv
Lesson 4: Modeling the Abutments and Flex
www.cadclips.com/downloads/RAC-ARCH-BM-FAMILY-4-MODEL-THE-ABUTMENTS-AND-FLEX.wmv
Lesson 5: Using Yes / No Parameters to Control Object Visibility
www.cadclips.com/downloads/RAC-ARCH-BM-FAMILY-5-YES-NO-PARAMETERS-TO-CONTROL-VISIBILITY.wmv
Lesson 6: Use Model Lines and the Linework Tools
www.cadclips.com/downloads/RAC-ARCH-BM-FAMILY-6-MODEL-LINES-AND-LINEWORK-TOOL.wmv
Lesson 7: Mental Ray Materials and Rendering
www.cadclips.com/downloads/RAC-ARCH-BM-FAMILY-7-MATERIALS-AND-RENDERING.wmv
Wednesday, September 17, 2008
REVIT Video - Yes No Parameter to Control Visibility
Did you know you can easily turn On and Off individual sub components of a REVIT family ?
It's simple to do and you don't have to have any experience making families.
You can do this to any family regardless of who made the family or how complex it is.
This functionality can be applied to REVIT Architecture, Structure or MEP.
1. Open the Family in the family editor.
2. Create a new parameter and make it a Yes / No type.
3. Assign that parameter to the Visibility property of the desired family sub component.
4. Save the family and place it in a project.
5. Select the family and change the new Visibility property parameter to Yes or No.
DONE !
Here's a quick Video below that sums it all up in about 5 minutes.
A special THANKS to CadDigest for posting this tutorial on their site.
Wednesday, September 10, 2008
REVIT House Modeled in 10 Minutes

Did you ever think you could model a complete house in 10 minutes? Well you can, and I did.
The image above is just an animated GIF. Feel free to 'right click' it and 'save picture as. .' to download the file.
You can view the full video below or download it from here > REVIT 10 Minute House
Wednesday, August 13, 2008
REVIT Align Tool Using 3D Surfaces
This Align tip is nothing new but I do come across users who are not aware of this so I thought I'd post a quick tip.
Did you know that you can use the Align tool and select 3d surfaces as the controlling edge and receiving edge of the alignment while in a 3d view as shown below.


Tuesday, June 03, 2008
My blog is unlocked after 5 months of lockdown.
Well it took just under 5 months to unlock my blog. Wow !
Thanks google. . . not. I had to send an email to google religiously every week for 19 weeks or this blog would have been erased for ever !
I was getting really tired of seeing that Pantheon posting. Ok well, I guess I can get back on track with more REVIT educational information.
Stay tuned.
Tuesday, January 15, 2008
Pantheon Model included with REVIT MEP
There is a nice model file provided in the 'common' folder of the REVIT Training folders of REVIT. I created a quick animantion below depicting all the basic parts.

Autodesk Acquires Robobat !

Thank you Autodesk !
Jan 15, 08 - Autodesk, Inc. today announced that it has completed the acquisition of Robobat for approximately $42.5 million.
Read all about it Autodesk Acquires Robobat !
This is VERY good news for all us REVITeers and specifically the Structural types.
For those of you who are not already aware, Robobat currently makes a Structural Analysis extension for 'REVIT Structure'. Only now they will be working from the inside with all the Autodesk resources.
Jan 15, 08 - Autodesk, Inc. today announced that it has completed the acquisition of Robobat for approximately $42.5 million.
Read all about it Autodesk Acquires Robobat !
This is VERY good news for all us REVITeers and specifically the Structural types.
For those of you who are not already aware, Robobat currently makes a Structural Analysis extension for 'REVIT Structure'. Only now they will be working from the inside with all the Autodesk resources.
The RST models just got new legs.
Thanks Autodesk !
Thanks Autodesk !
Here's the good news.
"Effective on, 14/01/2008, Autodesk will be simplifying accessibility and offering greater value to customers using Revit Structure by providing all Extensions for Revit, both fee and free, through the Autodesk Subscription Program.
In addition to having access to all previously fee based extensions for free in one repository, Revit Structure customers will also be delighted with new functionalities in current Extensions, new Extensions and much more.
Monday, January 14, 2008
CADclip - REVIT 2008 Color Fill Schemes Theory
 The image above (click for larger view) depicts the suggested steps involved in understanding how REVIT Color Fill Schemes and Legends work.
Play the video below for a very informative 10 minute REVIT 2008 MEP CADclip video tutorial on the 'Theory' behind using Color Fill Schemes.
Although REVIT MEP is being utilized in this video tutorial, this same 'theory' can also be applied to both REVIT Structure or REVIT Architecture.
Monday, January 07, 2008
REVIT Implementation Tips
Below is a video slide show describing a few tips and guidelines
when implementing your REVIT product(s).
Click the 'Play > ' button above.
To summarize the slide show above you need to:
1. Mark up a set of exiting plans with color coded pens
2. Compare it to what Autodesk supplies
3. Build or Seek out the missing content and symbology
4. Put it all in your Template file(s)
5. Start a simple (as possible) Pilot Project
6. Maintain the Template file(s)
Thursday, November 29, 2007
The REVIT Tipping point

The Tipping Point' by Malcolm Gladwell is a great book. I recommend it. I read it about a year ago. I can relate Mr Gladwells book to REVIT as it starts to tip.
I will not attempt to paraphrase the book but the underlying information I extrapolated was this: At some point for a combination of reasons an epidemic starts to take place. It could be with regards to a fashion piece or a crime wave or a product sale or a trend of some sort.
It starts from way down and can take a long time to reach the tipping point but then it tips over. It tips over and catches on like grassfire. Google most definately had a tipping point. (did you buy shares?)
McDonalds and Coca Cola are living proof that you can spend millions of $$ and try to artificially create an epidemic but fail. In fact, things generally 'Tip' because of word of mouth. That's how Google did it. Once you get certain 'key' people to get on board it starts to manifest and grow. But it does not start with a super bowl commercial.
I correspond with lots of people around the world every day and I joyfully scour the internet for press releases and inside CAD information. I am starting to see more and more commitments like "We plan to be 90% REVIT by 2009".
I've said it before. The next 24 months are going to see some change.
Could we be witnesing the REVIT Tipping point ?
"You bet your bottom dollar we are". . . . T I M B E R !
You heard it here first !
Tuesday, November 27, 2007
Revit Structure 2008 Imperial Tutorials and Datasets
As most us us know, ALL of the REVIT 2008 tutorial help files and data sets do NOT come with the normal installation. This is a MAJOR pain in the behind. When you open the help tutorials they tell you how to go and download the files. It takes a few minutes and some skilled know how but even I got caught in a loop hole that I could not get out of.
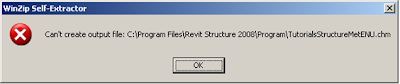
The data sets download and install ok. Then I got the imperial help file TutorialsStructureImpENU.chm all working but could not for the life of me get the metric tutorials help file to install (or unzip). I kept getting the error shown below.
I tried again the next day. Same error. Finally weeks later it worked. I had no idea why it worked this time.
Then fianlly the reason dawned on me, becasue things like that eat away at me until I find out WHY ! It was because I was actually in the installed help file (dialog box) that tells you how to go get the real help file and when you try to install the real help file it won't let you unzip it because you are in the file it is trying to over write. DAM !
MAJOR inconvenience to say the least.
So if you found the above information confusing just remember if you get the error shown below while trying to unzip the downloaded tutorial help file it means 'go close the REVIT tutorial help dialog box' then try again.
Now, there's something really cool after it's all said and done. I noticed that if your project units 'length' parameter is 'inches' or imperial units the imperial tutorial help file gets opened when you click on Help > Tutorials. If your project units 'length' parameter is 'millimeters' or metric units the metric tutorials help file is opened from the same Help > Tutorials click. If only the installation was so slick !
Here is the contents of the original installed tutorial help file:
I have added one very crutial line in RED.
------------------------------------------------------------
Revit Structure 2008 Imperial Tutorials and Datasets
The imperial tutorials and datasets are now available on the Autodesk website.
Follow the instructions below to download the tutorial exercises and datasets to your computer.
Tutorial Download Instructions:
Navigate to: C:\Program Files\Revit Structure 2008\Program
Right-click each tutorial CHM file, click Properties, clear the Read-only attribute, and then click OK.
Click the following link to access the Revit Structure 2008 Documentation download page. www.autodesk.com/revitstructure-documentation
Under Select a language, select your language.
On the Autodesk Revit Structure 2008 page, under Tutorials, double-click the Revit Structure Imperial Tutorial EXE file.
In the File Download dialog, click Save to save the file to your Desktop.
Make sure you close the Help dialog box in REVIT before continuing.
On your Desktop, double-click the EXE file that you downloaded to automatically extract the file to the correct folder on your local computer.
Note: After the download is complete, the imperial tutorials will be available by clicking Help menu -> Tutorials.
Dataset Download instructions:
On the Autodesk Revit Structure 2008 page, under Imperial Datasets, double-click the first
Revit Structure Dataset EXE file.
In the File Download dialog, click Save to save the file to your Desktop.
On your Desktop, double-click the EXE file that you downloaded to automatically extract the datasets to the correct folders on your local computer.
Using the same method, extract the remaining dataset EXE files on the page.Note: Once the downloads are complete, all datasets will be available in the Training folder within Revit Structure 2008.
The data sets download and install ok. Then I got the imperial help file TutorialsStructureImpENU.chm all working but could not for the life of me get the metric tutorials help file to install (or unzip). I kept getting the error shown below.
I tried again the next day. Same error. Finally weeks later it worked. I had no idea why it worked this time.
Then fianlly the reason dawned on me, becasue things like that eat away at me until I find out WHY ! It was because I was actually in the installed help file (dialog box) that tells you how to go get the real help file and when you try to install the real help file it won't let you unzip it because you are in the file it is trying to over write. DAM !
MAJOR inconvenience to say the least.
So if you found the above information confusing just remember if you get the error shown below while trying to unzip the downloaded tutorial help file it means 'go close the REVIT tutorial help dialog box' then try again.
Now, there's something really cool after it's all said and done. I noticed that if your project units 'length' parameter is 'inches' or imperial units the imperial tutorial help file gets opened when you click on Help > Tutorials. If your project units 'length' parameter is 'millimeters' or metric units the metric tutorials help file is opened from the same Help > Tutorials click. If only the installation was so slick !
Here is the contents of the original installed tutorial help file:
I have added one very crutial line in RED.
------------------------------------------------------------
Revit Structure 2008 Imperial Tutorials and Datasets
The imperial tutorials and datasets are now available on the Autodesk website.
Follow the instructions below to download the tutorial exercises and datasets to your computer.
Tutorial Download Instructions:
Navigate to: C:\Program Files\Revit Structure 2008\Program
Right-click each tutorial CHM file, click Properties, clear the Read-only attribute, and then click OK.
Click the following link to access the Revit Structure 2008 Documentation download page. www.autodesk.com/revitstructure-documentation
Under Select a language, select your language.
On the Autodesk Revit Structure 2008 page, under Tutorials, double-click the Revit Structure Imperial Tutorial EXE file.
In the File Download dialog, click Save to save the file to your Desktop.
Make sure you close the Help dialog box in REVIT before continuing.
On your Desktop, double-click the EXE file that you downloaded to automatically extract the file to the correct folder on your local computer.
Note: After the download is complete, the imperial tutorials will be available by clicking Help menu -> Tutorials.
Dataset Download instructions:
On the Autodesk Revit Structure 2008 page, under Imperial Datasets, double-click the first
Revit Structure Dataset EXE file.
In the File Download dialog, click Save to save the file to your Desktop.
On your Desktop, double-click the EXE file that you downloaded to automatically extract the datasets to the correct folders on your local computer.
Using the same method, extract the remaining dataset EXE files on the page.Note: Once the downloads are complete, all datasets will be available in the Training folder within Revit Structure 2008.
REVIT MEP Video Tutorial - Energy Data Setup
Above is a 6 minute video tutorial demonstrating how to setup the Energy Data properties for the REVIT MEP project. Once this is done you can use the awesome Heating and Cooling Load calculations API provided by IES to create the report.
From there we apply those loads to our mechanical system and start to layout the physical model.
We specify the 'Building type' and the 'Building Construction (assembly) types' to further enhance the accuracy of the energy analysis. See images below.

Building Type

Building Construction (assembly) Types
Thanks to  for posting this tutorial on their site.
for posting this tutorial on their site. Monday, November 26, 2007
REVIT Video Tutorial - Hide Flat Roof Superfluous Linework
Above is a great 3 minute video tutorial demonstrating how to get rid of extraneous or superfluous linework that REVIT adds in to triangular flat sloped roofs and floors.
You use 'invisible' linework to cover up the unwanted lines. To reverse the process do the same thing but change the linework back to (by catagory) by selecting (by catagory. . . . or any other linetype) from he linework type selector.
Note the before and after pictures below.

BEFORE

AFTER
Thanks to for posting this tutorial on their site.
for posting this tutorial on their site. Wednesday, November 21, 2007
REVIT BIM and Cost Estimating White Paper
 I stumbled upon this very informative white paper and thought I would share.
Click the image above to access the white paper in PDF format.
Click the image below to navigate to a 3rd party Estimating software QuickBill3D that interprets an exported REVIT schedule and then tabulates and reformats that data to industry standards.

Saturday, November 17, 2007
REVIT Horizontal and Vertical Orthographic Snap Angle Tips
Above is a 6 minute video tutorial demonstrating a couple quick tips on drawing linear objects in and around the orthographic axis.
Thanks to for posting this tutorial on their site.
for posting this tutorial on their site. Friday, November 16, 2007
USG Design Studio for REVIT Content

I have taken the liberty of creaing a 3 minute video (above) on a little discovery I found on Steve Staffords - REVIT OpEd blog.
This discovery is the USG Design Studio for REVIT content web site. It's free, it's cool, it's real and it's ready to be used.


You can even build a wall type right on the web site for download. I have not tried that yet but I will.

Below are the wall types I downloaded in the form of a REVIT *.RTE template file. Then I opened that file and 'cut and pasted' the USG wall types into my project using the 'project browser'. And as we already know......with the walls come all the 'materials', right !
I have to say it .... USG Rocks !

REVIT MEP (RME) Content Extensions Download
I have noticed something very significant as I am learning to use REVIT MEP (RME).
This as compared to learning REVIT Architecture (RAC) and REVIT Structure (RST).
RAC and RST are mostly about molding the 'materials' into place.
RME is all about placing fixtures, fittings, and equipment within a logical system.
I look at it as 'Materials' vs 'Parts'.
Bottom line....RME needs parts (families). Lots and lots and lots of parts (families) with all the correct specifications.
So then, just as I turn around Autodesk has just released new RME content which you can get from the link below.
FYI - I had a problem unzipping the downloaded file from the link below (could not overwrite an rfa file) so I extracted it to a different folder from the default folder and then manually copied the files to the Library folder.
Here's the download link (metric and imperial content)
More REVIT Content Downloads at these locations below.
Broutek Mechanical and Piping components.
USC Interiors, Lighting, Ceilings
Thursday, November 08, 2007
Autodesk Freewheel and DWF fun !
Thanks to for posting this tutorial on their site.
for posting this tutorial on their site.Below I've embedded 4 DWF exports from REVIT 2008 using the cool 'FREE'
Autodesk Freewheel technology.

The first Freewheel viewer displays a linked 2d DWF exported from REVIT MEP and the second viewer shows a 3D DWF linked from a REVIT Architecture export.
It's weird.....once you hover your mouse over the viewer(s) below you can (and will) :
- use the wheel button on your mouse to zoom in and out.
- dynamicly pan by pressing the wheel button
It's weird.....once you hover your mouse over the viewer(s) below you can (and will) :
- use the wheel button on your mouse to zoom in and out.
- dynamicly pan by pressing the wheel button
You can also combine this with the zoom and pan tools provided on the menu bar. Then you can further use your regular left mouse button in combination with the menu bar tools.
I would just like to change the zoom increment.
Lastly on the upper right you may see additional dwf pages.
How fun is this !
Below is a 3D DWF file. You can use the 'Orbit' tool !
Lastly on the upper right you may see additional dwf pages.
How fun is this !
Below is a 3D DWF file. You can use the 'Orbit' tool !
This one seems to go a little 'wonkie' at times.
Orbit TIP: When using the 'orbit' tool, start by resticting your mouse movement to only horizontal and vertical, starting the movement from the center of the circle. . . . .got the hang of it . . . . . ok now click your mouse outside the circle (cursor changes) move around the outside of the circle. Now you are rotating about the viewing axis. That's it, rock and roll.
This is simple to do and could very easily be applied in so many ways my head is spinning (no pun intended).
Below is a sample 3D DWF of sanitary waste piping.
This is simple to do and could very easily be applied in so many ways my head is spinning (no pun intended).
Below is a sample 3D DWF of sanitary waste piping.
Wednesday, November 07, 2007


Best Practice Tips for Worksets
I swiped these notes from a burried Autodesk web site and it is a little dated but still applies.
Best Practice Tips for Worksets:
1. It is important to remember that once Worksets are activated, there is no way to turn them off. The only options available are to continue using Worksets, or to revert to a previously saved file (before Worksets were activated).
2. The Workset username is determined by the Windows log-on name, not by the Revit installation process.
3. If mapped drives are used, all users of the same central file must map the central's network path to the same letter. Worksets will not work with different users trying to access the central file using different network paths because currently Revit stores the absolute path with the Central File. The Central File (CF) understands an absolute path which must be identical on all computers that are working on the project while using worksets. For example, if User 1 has mapped his J:\ drive to the CF location, User 2 must also map his J:\ drive when working on the same project. If this practice is not followed, error messages that the CF cannot be found will occur."
4. To change the number of backup files for a project after the initial Save As..., choose the Save As... option again, and select the Options... button. Here you can change the maximum number of backup files as desired.
Thanks to for posting this tutorial on their site.
5. There is no prompt to alert the user that he is working in the Central file (While it is not good practice for many reasons, a user may work directly in the central file at any given time). A good way to quickly determine if you are in the central file or the local file is by looking at the 'Save to Central' icon located next to the standard Save icon in the standard tool bar. If the icon is grayed out, then the user is currently in the Central File. If the user is in a local file, the icon will be active.
6. While working in a local file and perfoming a 'Save to Central...', is a backup created?Yes. In this case, the existing Central File becomes the backup and a new Central File is created (typically on the server). A user may also just choose File ; Save, which does not save their changes to the Central File. In this second scenario, the user is saving his or her "local" file, and a backup of the local file is created in the same directory where their local file resides (typically on their hard drive). In both cases, the backups are contained in the directory with the same name as the file.
7. After checking out a workset, if changes are made to the model or the Settings/Views, the user should 'Save to Central' before checking the workset back in. If the worksets are not checked back in, any changes will be lost because Revit only saves changes that are in Worksets that are marked Editable at the time of Save to Central.
8. Editable at risk status: Use caution when checking out worksets from a local copy without being connected to the network and the Central Location. This user must be extremely careful about checking in his/her changes prior to anyone else; otherwise there is a risk of losing changes to all worksets that the user checked out. The benefit of this status is that if a copy of the central location is taken home and the user forgets to check out a certain workset, he/she can still do so from home without reconnecting to the Central Location.
for posting this tutorial on their site.
5. There is no prompt to alert the user that he is working in the Central file (While it is not good practice for many reasons, a user may work directly in the central file at any given time). A good way to quickly determine if you are in the central file or the local file is by looking at the 'Save to Central' icon located next to the standard Save icon in the standard tool bar. If the icon is grayed out, then the user is currently in the Central File. If the user is in a local file, the icon will be active.
6. While working in a local file and perfoming a 'Save to Central...', is a backup created?Yes. In this case, the existing Central File becomes the backup and a new Central File is created (typically on the server). A user may also just choose File ; Save, which does not save their changes to the Central File. In this second scenario, the user is saving his or her "local" file, and a backup of the local file is created in the same directory where their local file resides (typically on their hard drive). In both cases, the backups are contained in the directory with the same name as the file.
7. After checking out a workset, if changes are made to the model or the Settings/Views, the user should 'Save to Central' before checking the workset back in. If the worksets are not checked back in, any changes will be lost because Revit only saves changes that are in Worksets that are marked Editable at the time of Save to Central.
8. Editable at risk status: Use caution when checking out worksets from a local copy without being connected to the network and the Central Location. This user must be extremely careful about checking in his/her changes prior to anyone else; otherwise there is a risk of losing changes to all worksets that the user checked out. The benefit of this status is that if a copy of the central location is taken home and the user forgets to check out a certain workset, he/she can still do so from home without reconnecting to the Central Location. Greenbuild ... IES launch Revit Architecture

'Integrated Environmental Solutions Ltd.' provides plug-in for Autodesk REVIT products.
Tuesday, November 06, 2007
REVIT MEP HVAC VIdeo Demonstration
Above is a 10 minute demonstration on using
REVIT MEP (RME) to create an HVAC, Secondary Supply Air System.
Here's how we do it.
1. We Link in the Architectural Model.
2. Copy/Monitor the Levels and Rooms after synchronizing the phases between the two files.
3. Run the 'IES' Heating and Cooling load calculations to get the Air Flow requirements.
4. Choose a room and insert 2 Air Terminals (190 CFM diffusers) at 8'-0" and 1 VAV Unit (380 CFM ) at 9'-0".
5. Create the 'logical system' to include the 2 terminals and one piece of equipment.
6. Convert the 'system' to 1 of 5 Ductwork routing options using the Ductwork conversion rules.
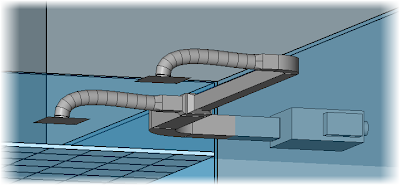
Are here's what it looks like when it's' done.
I can feel that air moving already !
Friday, November 02, 2007
REVIT MEP exceeds REVIT Architecture sales

Ok ok, I gotcha. I'm a little premature.
But this is my prediction. REVIT MEP (RME) will beat REVIT Architecture (RAC) sales at some point in the foreseable future. I guess the question is 'how many mechanical consulting firms are there in the world"?
If you are in the MEP design business you should be looking into how REVIT MEP can improve your deliverable quality and speed up your turn over time. Get someone to give you a demo.
Here's the bad news people. Listen up. If you are strictly a CAD draftsperson in the MEP business you should get some 'design' training. With these new 3D design tools and 3rd party plug-ins the engineer or designer doesn't need the basic draftsperson anymore. This fact combined with the fact that you could never get your engineers motivated to learn AutoCAD (layers..xrefs....no thanks) but they are gonna jump at this opportunity and eliminate someones job in the mean time. The engineer can design (in 3D) and produce the documennts all on their own with a single application.
RME does have some current issues with worksharing and multiple users on large scale projects but it is still in it's infant stage. I am very positive about it's future.
But this is my prediction. REVIT MEP (RME) will beat REVIT Architecture (RAC) sales at some point in the foreseable future. I guess the question is 'how many mechanical consulting firms are there in the world"?
If you are in the MEP design business you should be looking into how REVIT MEP can improve your deliverable quality and speed up your turn over time. Get someone to give you a demo.
Here's the bad news people. Listen up. If you are strictly a CAD draftsperson in the MEP business you should get some 'design' training. With these new 3D design tools and 3rd party plug-ins the engineer or designer doesn't need the basic draftsperson anymore. This fact combined with the fact that you could never get your engineers motivated to learn AutoCAD (layers..xrefs....no thanks) but they are gonna jump at this opportunity and eliminate someones job in the mean time. The engineer can design (in 3D) and produce the documennts all on their own with a single application.
RME does have some current issues with worksharing and multiple users on large scale projects but it is still in it's infant stage. I am very positive about it's future.
Subscribe to:
Posts (Atom)