Wednesday, August 24, 2011
Friday, August 12, 2011
All REVIT 2012 Kitchen Families
Here is an image of all the Kitchen related Families that REVIT Architecture 2012 includes out of the box.
These families are located in the Casework and Specialty Equipment folders (categories) of the REVIT Library.
If you want a variation of one of these families just click on it, then click Edit Type on the Properties Palette. Then Duplicate it and name it. Then change some of the Type Parameters and Bob's your Uncle !.
The counter top families have grips and you can stretch them around but only in a Plan view.
Do some investigation by checking out the different Type Parameters on each individual Family.
Here is a link to the REVIT 2012 Kitchen Families Project that you see above.
CADclips REVIT Videos Here
Sunday, August 07, 2011
REVIT Training for iPod iPhone and iPad in MP4 and M4V
CADclips has a virtual REVIT Tutorial / Training APP.
CADclips has started releasing their REVIT Video Training Tutorials in both MP4 and M4V for the iPod, iPhone and iPad !
After all, why not use your hand held Apple Device to Learn REVIT ? We all have one.
Now you can Learn REVIT while sitting on the bus or sitting on the john !
YOU DECIDE : )
Below is a sample REVIT CADclip Tutorial in MV4 format Zipped up for your iPhone along with basic directions on getting the video onto your iPhone.
This is the raw video file.
This is a zipped version of the file.
1. Download the zip file above and unzip it somewhere.
2. Plug your iPhone into your computer.
3. Sync the iPhone with iTunes
4. Note that your iPhone now shows up in iTunes as a Device with different folders below it including 'Movies'.
5. Click into the iPhone 'Movies' folder.
6. Drag and drop the unzipped RAC-2011-SECTION-BUBBLES.M4V video file to the iPhone 'Movies' folder and let it copy.
7. Close iTunes and unplug your iPhone.
8. On your iPhone go to the iPod APP, then Movies and play the CADclip.
The rest is up to you.
If anyone has any suggestions as to a better process just add a comment.
Can anyone suggest a good APP for downloading directly to your iPhone . . . . iDownloads ?
Sunday, July 31, 2011
Daryl's REVIT Oath
CADclips Announces New $39 and $99 REVIT Video Training Tutorial Subscription
I do alot of teaching and the above REVIT Oath is provided to all REVIT Students who need to Learn REVIT and get into the REVIT mind set.
READ IT OUT LOAD and READ IT PROUD !
CAD is out, BIM is in.
I will be adding 'REVIT Expert' to my resume.
I will clear my mind of all AutoCAD knowledge.
All objects are drawn real world size.
All Annotation objects are View Specific and REVIT Controls the Scale.
I will keep my Left hand poised over the ESC key and my Right hand on the Mouse. (pencil in mouth).
I Understand that with Change and Knowledge comes Anguish and Frustration but I will Persevere.
These are my friends in this order: Project Template, Levels, Grids, Floors, Walls, Roofs, Discipline Specific Content.
I will not be afraid of Worksets and Linking Files.
The 'Align' tool is my best friend.
I will learn the difference between Instance Properties and Type Properties.
I will create 3D Perspective Views, Sections and Elevations that I have no intension of printing.
I promise to look busy when I can get the work done in half the normal time.
CADclips WILL show me the way.
Saturday, July 23, 2011
REVIT Worksets At a Glance
I was reviewing the concept of enabling and using REVIT Worksets to someone who had to learn the concept pretty much immediately.
In a nut shell, REVIT Worksets allow multiple users to work on the same project file at the same time which equates to productivity and distribution of REVIT skill sets on the project.
". . . . . .and this ain't AutoCAD Xref's my friends !"
I am now developing a new CADclips Video Training Tutorial Series on Worksets and thought I'd throw together this post for your learning pleasure.
Outside the multi user access, Worksets allows you to break up the model into logical user defined groups (for lack of better word) of your choice. The value of this comes blazing through when you are undertaking a large project with a large model file and a hand full of REVIT users with 'varying skill sets'.
It allows you to 'check out' a Workset and you become the temporary owner of that workset. You do not need 'editing access' to the entire model to do your work (although you can see the entire model and you can borrow elements from each other). Having the entire REVIT model available for 'editing' maaakes yooour commmmputer gooooo sloooow. Here's a scenerio > Today
I am working on 'exterior walls' and you are managing all the 'sheets'. Someone else is working on 'Stairs and Ramps'. A forth person is managing the 'links' from other REVIT models. Can you just see the productivity !
Here's a few possible workset names:.A Wing, B Wing, C Wing, Building Core, Exterior Walls, Interior Partitions, Curtain Walls, Foundations, Views, Furniture, Bathrooms, Windows, Doors, Roofs, Floors, Site, Sheets, Levels and Grids, Annotation, Railings, Egress, Load Bearing Walls, Project Standards, Mechanical, Structural, Architectural, Level 1 Walls, Level 2 Walls, etc. etc. You can make up your own workflow logic.
Worksets are not just limited to tangable elements like walls and floors and roofs. Worksets can included things like material definitions, annotation styles, views, families.
REVIT automatically generates specific worksets. The rest is up to you.
Here's another good use. Worksets allows you to manage the model editing access based on REVIT user skill. Junior staff do not get access to the critical elements of the model.
Worksets can be allocated based on REVIT skill set or expertise.You draw the line !
Below are a few pointers on the 'overview' of enabling and using REVIT Worksets. If anyone wants to add to this please feel free. I know there's more to it than just this.
Part 1 - Prepare and create the Central File.
1. Get the Project under way by regular REVIT processes and create the levels, grids, floors, exterior walls, roofs and 'project standards'.
2. Save the Project as is and then save it again and name it using the word 'Central' for example Central_Halifax_Theatre.rvt.
3. Open the new file named 'Central' and Enable 'Worksets'.
4. (Optional) Split the project up into additional worksets other than the default 'Workset1'.
5. Save this new Central file on the server, then close it. It is now a true Central File.
(REVIT can actually distinguish the difference between a regular rvt file and a central rvt file when the file gets opened)
Part 2 - Creating a local copy of the Central file for editing purposes
6. Varify your 'Username' in the REVIT Options dialog box under the 'General' Tab'. This will be used to name the local file you are about to create.
7. Varify the 'Default Path for User Files' in the REVIT Options dialog box under the 'File Locations' tab. This is where the local file will get located by completing the next few steps.
8. Open the central file but MAKE SURE YOU CHECK THE 'Create New Local' toggle.
Warning !!
DO NOT OPEN THE CENTRAL FILE from here on in unless you are an administrator.
Always, always always create a local copy.
DO NOT OPEN THE CENTRAL FILE from here on in unless you are an administrator.
Always, always always create a local copy.
I once saw a newbie double click a central file from windows explorer. My eyes bugged out and I just about #$%& myself !
9. Save the new local copy to your c:\ drive and put your own name in the file name.
For example Halifax_Theatre_YourName.rvt or consider the name REVIT prompts you with by appending the Central file name with your REVIT user name.
10. Work in this new local file, check out worksets or borrow elements. Save it locally regularly, save and synchronize to central regularly and relinquish elements / worksets you no longer need to edit.
11. Use the 'Reload Latest' tool up update your local file but not save your changes to the Central File. This is 'oneway' communication with the Central file.
12. At the end of the day
save locally,
save to central,
relinquish all elements,
close the local file
. . . . hit the golf course.
13. It is also highly recommended and a best practice to repeat steps 8 and 9 each day.
Yes this sounds crazy but true.
In other words, scrap yesterday's local file and start each working day with a fresh new local file. Don't be scared. Over time, local files can develop issues that can even effect the central model so don't keep your local file around for too long.
Rename the local file and save it away somewhere but make a new, fresh local file at least every couple days. You've been told : )
A wonderful 15 video series (approx. 3 hrs) has been produced and should be posted at CADclips shortly.
---------------------------------------
Below is a snipit of information on the new
REVIT 2012 Worksharing Display Modes
Thursday, July 21, 2011
REVIT Lecture Theatre Presentation Plans
Above is a 3D Section View and a Plan View of a Lecture Theatre.
Basically made up of Walls. Floors, Individual Stairs and a bunch of Tablet Chairs.
Wednesday, July 20, 2011
Cool REVIT Presentation Plans
CADclips Announces New $39 and $99 REVIT Video Training Tutorial Subscription
It's so easy to create a very basic but impressive presentation plan with REVIT.
Here's how to quickly create a plan as shown above.
1. Duplicate a view (without detailing) and rename accordingly.
2. Use 'copy' and 'paste same place' if you need to go back to the original view and get some of the detailing or text.
3. Select an item(s) in the new presentation view and click the light bulb tool (hide in view) and hide the categories and elements that you do not want to see.
4. In the 'type' properties of the Walls that you are using, set the 'Course Scale Fill Pattern' to 'Solid' and the 'Course Scale Fill Color' to 'Black'.
5. Now set the view 'Detail Level' to be 'Course'.
6. Click the 'Shadows' button and turn on Shadows..
7. Open the 'Graphics Display Options' dialog box and darken or lighten the shadows.
8. In the Graphics Display Options' dialog box click the 'Sun Settings' button and adjust the 'Altitude'. Click 'Apply' and play with these setings and use the apply button to see how your doing.
Maybe save a 'view template' from here and apply that to other views. You still may have to hide some random elements per view.
This works pretty much the same way for plans, elevations or 3d views.
Monday, July 18, 2011
REVIT 2012 View Control Bar
![]() |
Above is the 2011 Visual Style button.
2012 has removed the 'Shaded' option (that no one ever used anyway).
|
With the Release of REVIT 2012 we see some modifications to REVIT's 'View Control Bar'. Outside playing musical chairs with the 'Grapic Diplay Options' I like it.
This post describes some of those changes.
![]() |
Above is the 2012 Visual Styles button where 'Shaded with Edges" has become 'Shaded'. Then we also see that the 'Graphics Display Options' dialog box has been added here.
|
![]() |
| Above we see that 2012 has also moved the 'Graphics Display Options' to the View's Properties (where it should be). |
![]() |
Above we see the 2011 'Shadows' button.
Now it's just a toggle On / Off and the 'Graphics Display Options' has been relocated to two other locations described in this post.
|
![]() |
| Above we see the 2012 Shadows Toggle. On or Off. Thank you ! |
![]() |
Above we see the new, awesome 2012 Lock 3D view option for annotation purposes.
If you are in the default {3D} view it will prompt you to duplicate the view.
|
![]() |
Last we have the wonderful 2012 WorkSharing Display and settings !
WAIT FOR IT !!
|
Saturday, July 16, 2011
REVIT and ICF and IntegraSpec
This wall system has REVIT Architecture, Structure and more importantly REVIT MEP written all over it !!
REVIT Generated, Carbon Footprint Data.
I have started using ICF (Insulated Concrete Forms) for more than just foundations. This wall system is fantastic for the entire building envelope. It also works well with the Hambro Floor and Roof system.
IntegraSpec® (pronounced > integra . . . spec) is an innovative building system that builds stronger, safer, quieter, energy efficient and environmentally friendlier homes and structures.
IntegraSpec® is “The User Friendly ICF” TM is produced in Canada, USA and also 2 plants in Europe.
Their unique and patented design makes it the easiest and most versatile Insulated Concrete Wall System on the market today.
I should be offering a few ICF / REVIT tips over the coming months.
Below are some more images and details.
Thursday, July 14, 2011
REVIT Common Edges and Hidden Lines
CADclips Announces New $19, $39 and $99 REVIT Video Training Tutorial Subscriptions
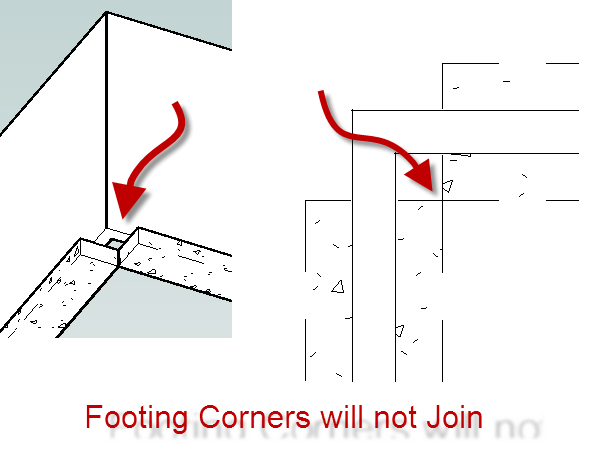
Figure 'A'
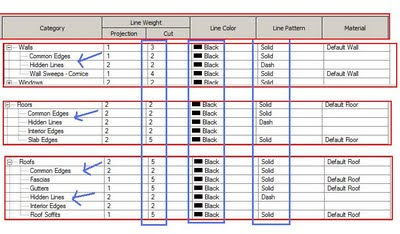
Have you even noticed the 'Object Style' Sub-category 'Common Edges' and 'Hidden Lines' and wonder "What the %$^# they are there for" ?
See Figure 'B' below.
These 'Common Edges' and 'Hidden Lines' sub-categories show up in the 'Objects Styles' all over the place in many system families.
Have you ever wished you could fine tune the line weights or patterns of the 'internal layers' of a wall, floor or roof etc ?
Well here's the poop.
The 'Common Edges' are the lines between the 'Layers' within a wall, or floor, or roof or ceiling structure. See Figure 'A' above.
The outer edges of the walls, floors etc take on the cut style of the main category 'Wall' or Floor' etc. The internal lines are the 'Common Edges'.
Figure 'B'

Having said that enter . . . . . the override. . . . .
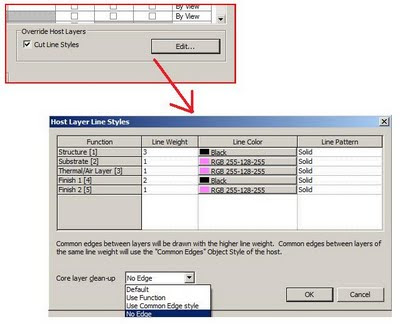
Yes the Visibility Graphics Override (per view) can fine tune those 'common edges' by checking the 'Cut Line Styles' option and click the 'Edit' button. See Figure 'C' below.
So with the 'common edges' sub-category and visibility graphics overrides you can really fine tune the appearance of the internal layers of walls, floors, roofs, ceilings etc. In section or plan.
Figure 'C'

Now, the 'Hidden Lines' sub-category is different.
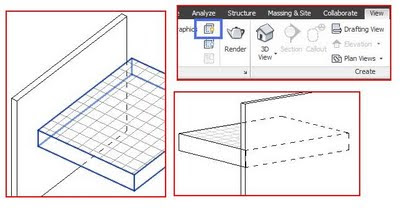
It is used to display edges of elements that have been told to show as 'Hidden' when behind a particular element. See Figure 'D' below.
Use the 'Show Hidden Lines' tool from of the View tab of the ribbon.
Pick the object to do the 'hidding' then pick the object to 'show as hidden'. The hidden lines then take on the appearance of the line style and weight specified in the sub-category 'Hidden Lines'. This tool can also be used with a combination of both model and detail objects in plan, elevation, section and 3D views !
Figure 'D'
Figure 'D'

In the image above the wall was told to be hidden by the floor
and the floor was told to be hidden by the wall.
Gotta run . . . .. . . .
Thursday, June 30, 2011
Wednesday, June 29, 2011
Friday, June 24, 2011
REVIT 2012 Roof Cricket CADclip
Below is a great little CADclip on how to create a roof cricket around a roof pentration.
In the CADclip above we use the normal roof edge slope methods and 2 very small edges.
You can also accomplish this cricket by using two 'Slope Arrows' as shown in the image below.
In the image below I placed the 2 slope arrows along the gable end of the cricket pointing towards the middle of the cricket. Note that you do NOT need to split the roof footprint linework on the gable edge. The roof footprint is made up of 3 segments only. Then to set the slope properties select the slope arrow(s) and use the properties palette. You can modify both arrows at the same time.


Monday, June 20, 2011
REVIT Railing with Glass Panels
Above are 4 images.
The top image is of the completed railings with one railing type for flat railings and one railing type for sloped railings.
Each railing type (flat and sloped) contains two railings, two end posts, 1" ballasters and 2'-0" wide glass panel 'ballasters'. Yes the glass panel is a ballaster !!
The second image is inside the new ballaster family template (Ballaster-Panel.rft).
Here we create and load two new ballaster panel families. Each ballaster panel family is made up of an extrusion 1/4" thick with 4 sides aligned and locked to the reference planes.
For the flat railing type, use the vertical and horizontal ref. planes.
For the sloped railing type, use the vertical and sloped ref. planes.
Make the extrusion material 'glass'.
After you load the two ballaster panel families into the project you can assign them to the new railing family.
Next we need to duplicate the 'Railing- Handrail -Pipe' family twice and rename them 'Glass Panel Rail Flat' and Glass Panel Rail Slope'.
The two new railing types will be identical other then specifying the sloped or flat ballaster panel.
The third image is of the Ballaster Placement dialog box found in the type properties of the railing.
Note the families and the numbers.
The forth image is of the Railing Structure dialog box found in the type properties of the railing.
Note the families and the numbers.
* From what I can tell, when working in the ballaster placement dialog box the 'distance from previous' is measured from the ballaster center lines.
*Also don't forget to set the ballaster 'Justify' to 'Spread Pattern to Fit'.
* You can set the panel width (2'-0" by default) in the type properties of the panel family listed in the project browser (double click).
The panel height is controlled by the ballaster placement dialog box. (top and base offset)
Subscribe to:
Posts (Atom)